C.R.A.F.T.

Creating Really Awesome Fun Things

  • Home
  • C.R.A.F.T.’s
    • The Book
    • ROUND UPS
  • Costumes
  • TRIPS
  • FREE PRINTABLES
    • 20 Crafts In 20 Days
    • Cultivating Creativity
  • PRIVACY POLICY
  • ABOUT
    • CONTACT
    • AS SEEN ON
    • You’re in!
Home » How to Decorate a Rental » Rental Trick #3: A Door Organizer

Rental Trick #3: A Door Organizer

May 11, 2012 By Jamie Dorobek 25 Comments

*UPDATE: The door organizer is bigger and better.
You might have seen this little guy on Design Sponge yesterday… I was shocked and thrilled and trying to explain to Andy why I was fist pumping and dancing on the couch. He just thinks I’m crazy. Today, I wanted to share a few more details with you about the door organizer…
First of all, have I told you about my Habitat Re-Store obsession? It’s pure greatness, and I was super excited when I pulled up to my Fort Lauderdale Re-Store to find that it was a good one, a really good one… get ready for this… it has a clearance center in another building! Habitat Re-stores are the Good Will of the building world. If a builder doesn’t use all of something, they drop it off at the Re-Store. Typically, you can find anything building related there… from doors, windows, sinks, tile, paint, even small things like light bulbs and hinges, and the one in Fort Lauderdale has tons of furniture. I learned about the re-store back in Austin, in college, when I wanted a full length mirror and had no closet or bathroom door to hang up one of those $5 Target full length mirrors. (See more on that here.)
Back to business… we live in Sunny. Sunny has some great qualities, the kitchen is not one of them. We needed storage that can come with us since she’s a rental. We are trying to minimize the amount of holes we put in her walls, even though the walls are concrete so holes are kind of out of question anyway! I’ve had this grand idea brewing for awhile now… I wanted a kitchen organizer on a door. Yep. I picked her up for $5, and have been moving her around, trying to decide where exactly she should live. I like the idea because
  • it won’t put holes in the wall
  • doesn’t stick out like a shelf
  • it will store lots of things that would typically go in drawers (we only have one!)
  • the door adds a pop of color to the all white kitchen
DIY Kitchen Organizing System
Wouldn’t you agree the door is so much nicer than this… haha.
DIY Kitchen Organizing System

I made a good ol’ to do list to whip this kitchen into a usable space (see more here), and the door is accomplishing 2, 4 & 6. Oh hallelujah to crossing those off of the list! It helped with 7, but I don’t think I can cross that one off quite yet 🙂

Here is what is going down:

  • Research and buy new dishes (I had no idea there were so many kinds… stone ware, fiesta ware, Corelle, porcelain, bone ware!) (more on that here)
  • Container for bag spices in the large food cabinet
  • Container for Tassimo pods to clear out the bottom shelf of the small food cabinet  (more on that here)
  • A home for pot holders and kitchen towels (possible a wall storage system?)
  • Deal with the random stuff on top of the cabinets
  • Get rid of/ organize random stuff next to dresser
  • Clean out and organize the dresser (The door helped!)
  • Buy and mount a paper towel holder
The door has been living in the kitchen for about a month now. I wanted to make sure she didn’t bother the fridge door and that we really liked it there. I thought about making a door coat/ bag rack for the foyer…
DIY Kitchen Organizing System
Although there is plenty of room for the door, it just looked funny to have 2 doors next each other. Don’t you think? Back to the kitchen. I had a color dilemma. The walls are white in our entire apartment. I don’t want to paint, just to have to paint back. I’ve lost one too many deposits that way. I figured the door could brighten up the space with a bold something. Here she is stands in mock up mode…
DIY Kitchen Organizing System

I was thinking green or orange, but neither looked great with the wood floor.

DIY Kitchen Organizing System
The vacuum just happen to be sitting next to the door and that yellow color was calling it’s name. But, I didn’t love the yellow with wood either. That’s when I decided to do the dipped thing. I know you’ve seen it around lately. Like this…
found on pinterest via little bit funky
and this round up from the little green notebook
found via pinterest
I was sold. I was dipping it.  That way the color didn’t fight with the wood floor. Andy said it well after he  saw the finished product, “the paint doesn’t make the door look so… uhh… country grandma”. #suchasweetie
In the meantime another little coincidence happened… 3M contacted me to see if I would like to try out their new line of Command Brand products… called Command Clear. I had not decided what I was going to use to organize the stuff… I was thinking I’d check out IKEA? This was perfect. This project was finally coming together. Here’s what they sent me…
Command Clear
These are greatness because they are clear, and would blend into my yellow paint. Plus, they have new little clear caddies… This turned out to be a perfect spot for clothespins… helping to clean out the dresser!
Back to the door. I set up shop on the balcony and taped down lots of newspaper and my drop cloth.
I gave the whole door a few coats of the satin paint and primer in one since I wanted to keep the bottom part of the door white.
 Then I used painters tape and newspaper to tape my diagonal line…

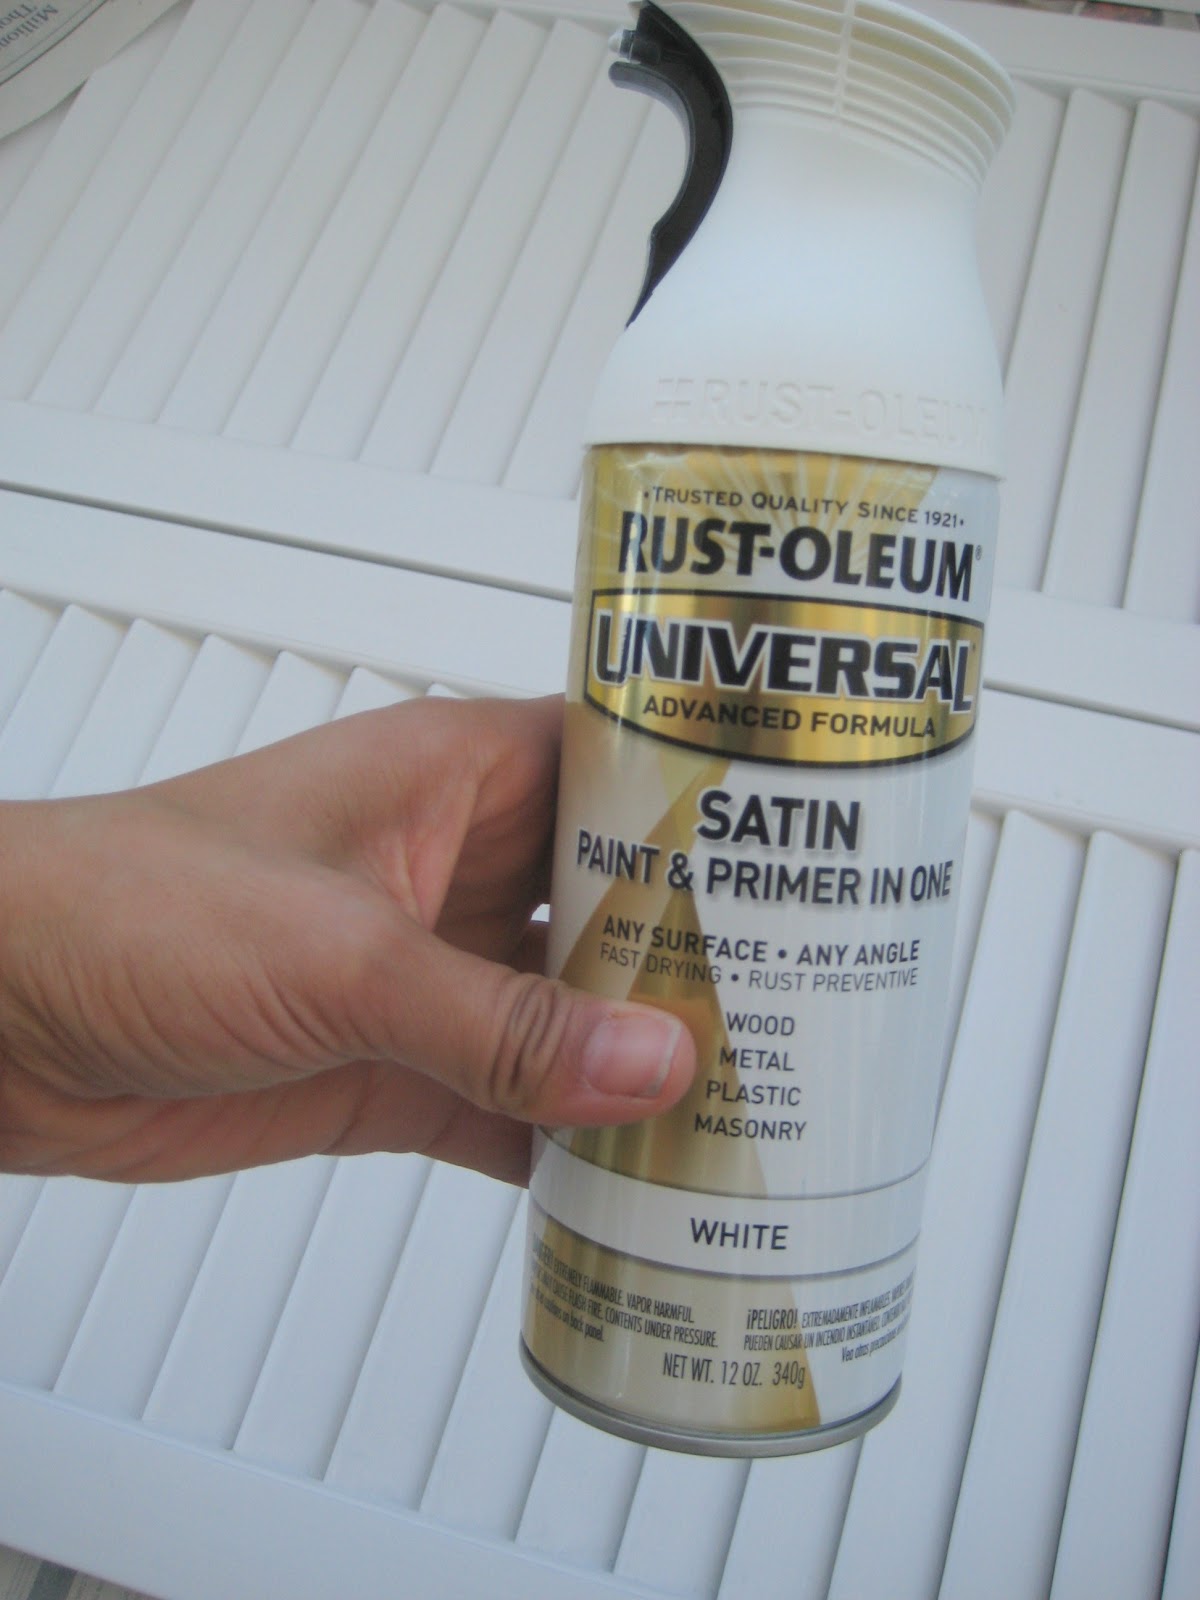
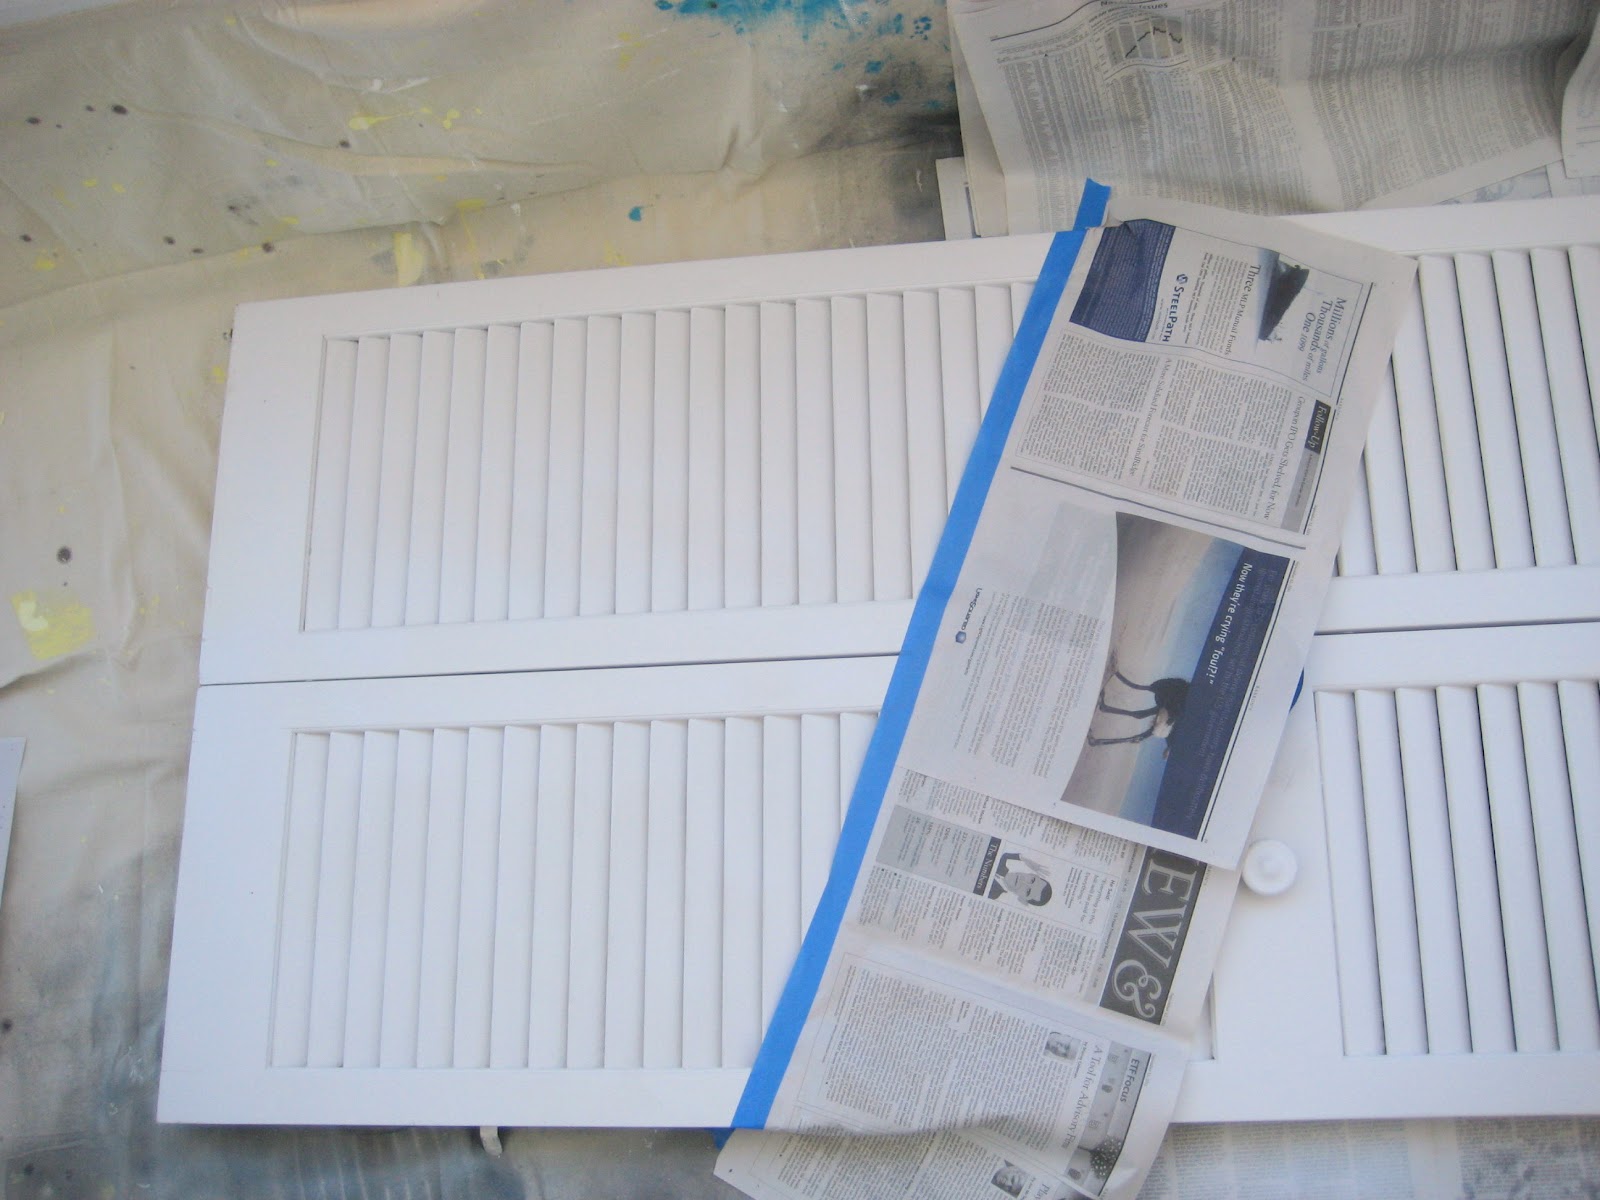
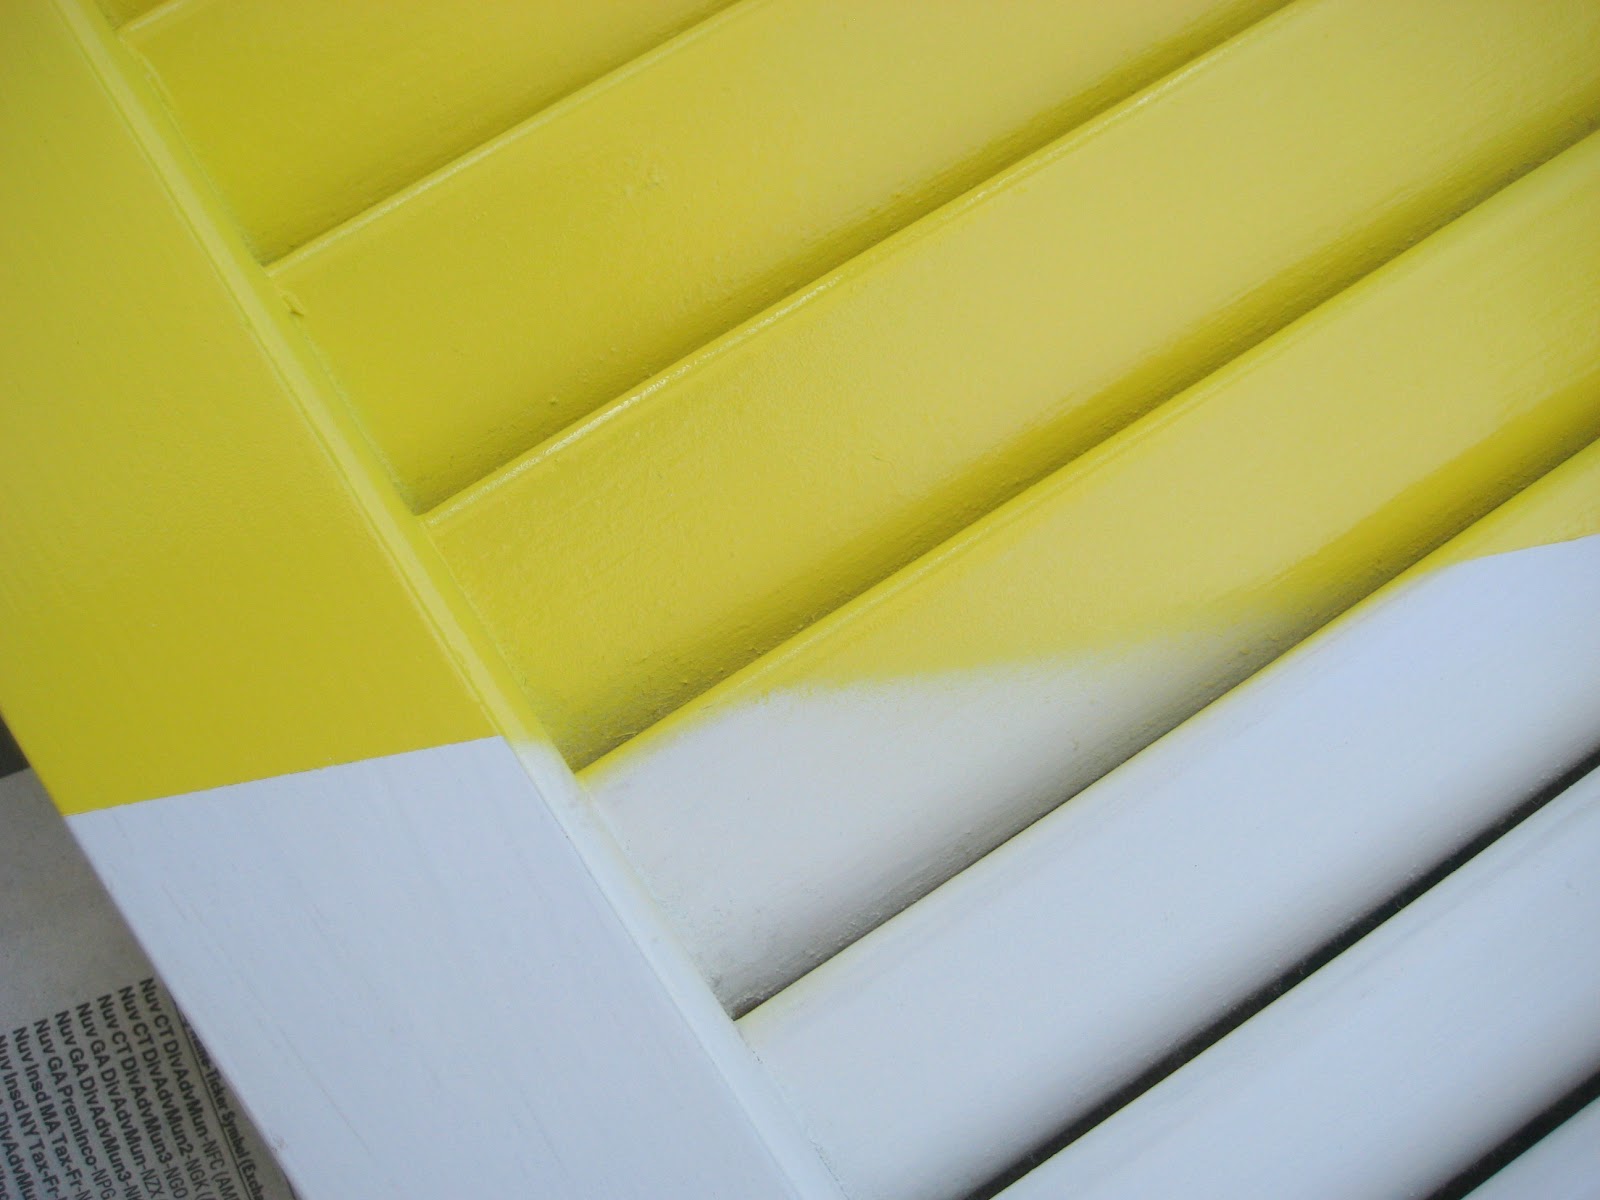
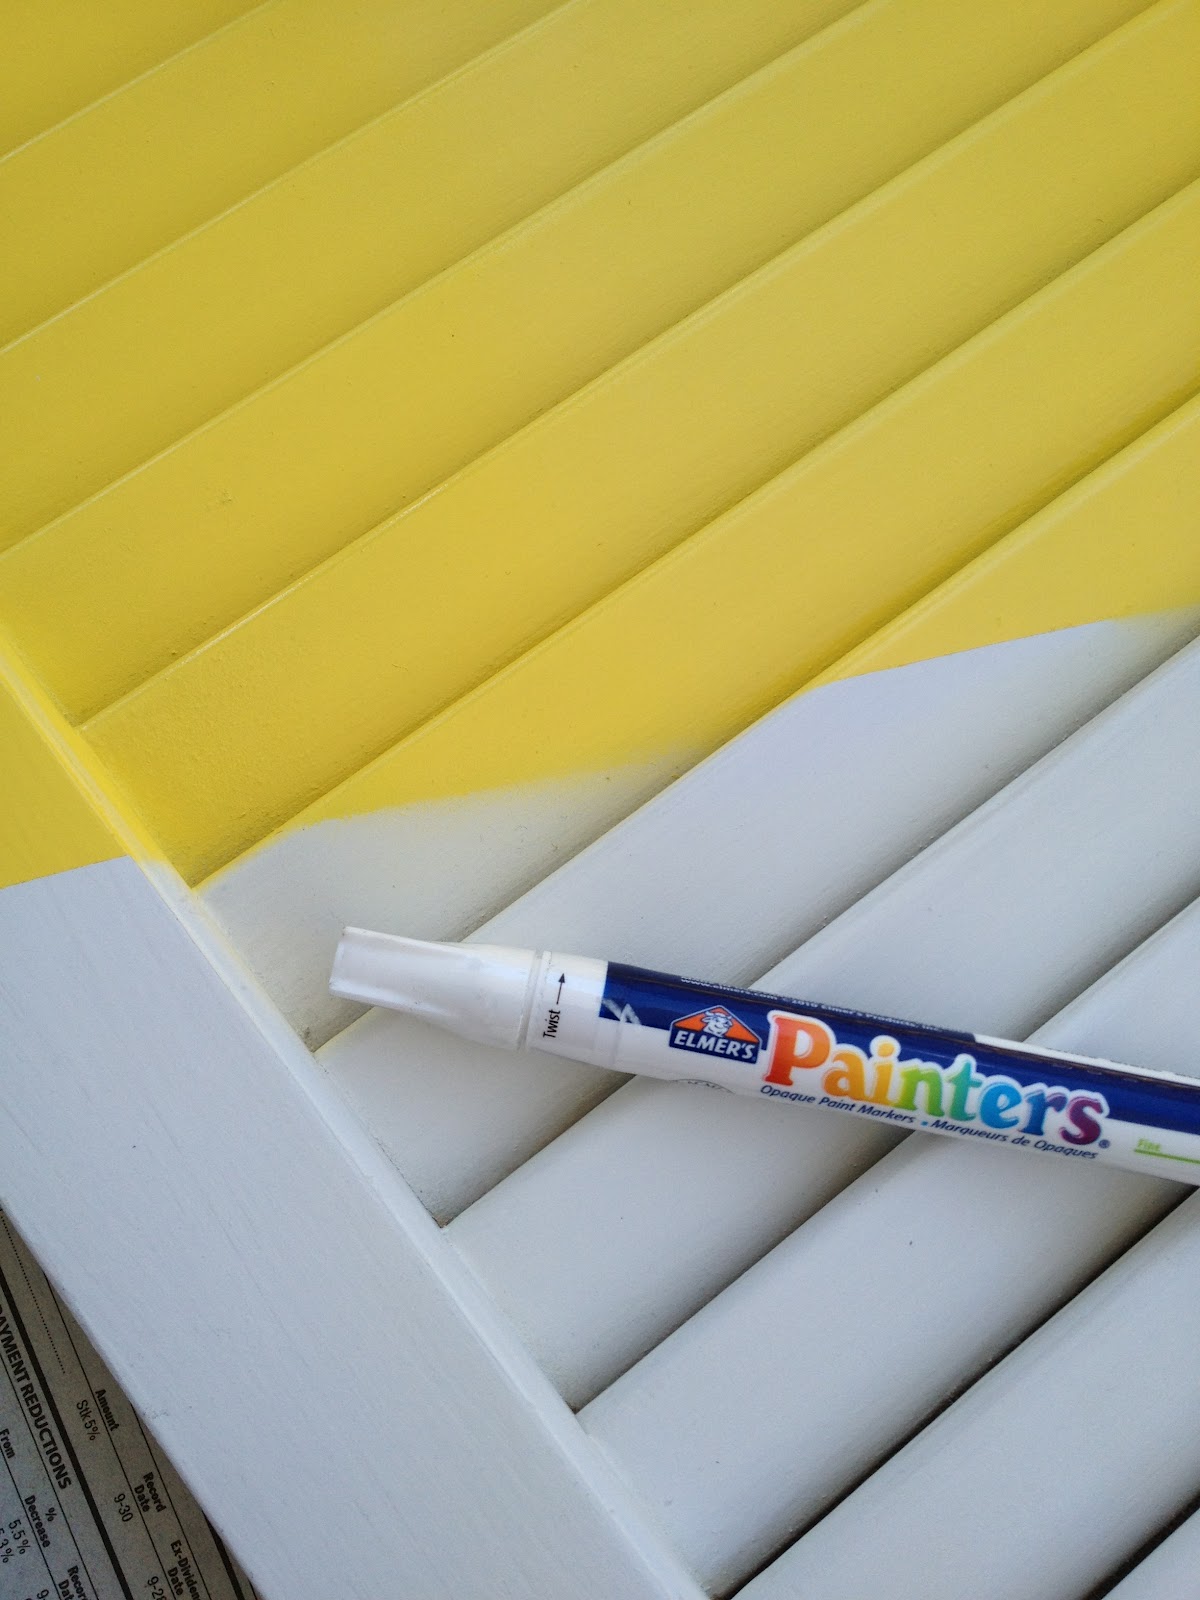
I sprayed the top yellow a few times…

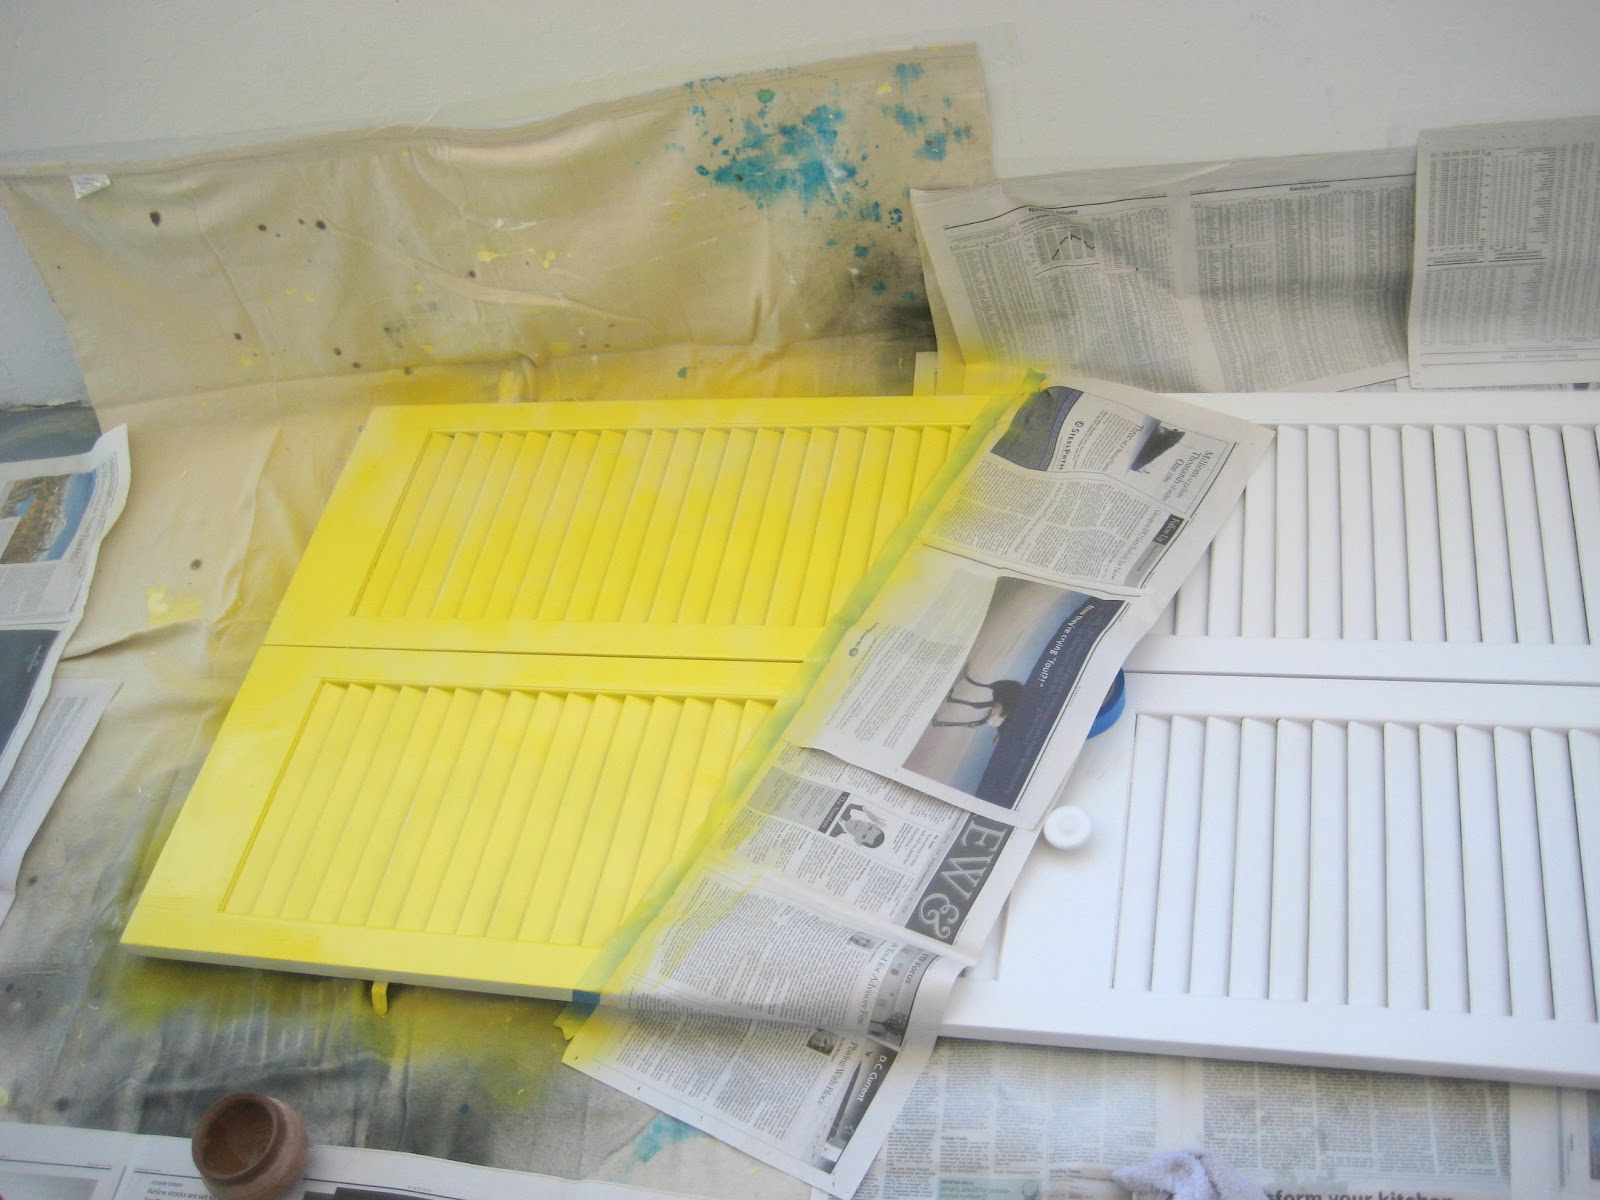
with Rustoleum sun yellow gloss spray paint…

There were 2 painting issues, the first was because I was impatient and did not let the white dry long enough… not a huge deal, I just caused myself more work. Oopsie. I picked the paper off, sanded it a little, gave it another spray, and really let it dry!

The second issue wasn’t my fault, but happened because of the shutter situation. The diagonal line didn’t turn out as well as I wanted it to. See how the line is crispy on the flat part and cloudy on the shutter part.
Nothing a little paint pen and paint brush can’t fix! It actually worked really well… It was a tedious project, but I wanted a crisp dipped line.
Kitchen door organizer
Can you tell at all? You can a little if you stare up close, but I’m happy with the end result.
DIY Kitchen Organizing System
Once the door’s line was crisped, dry, and the door was back in it’s spot… things started flying on that sucker. 3M products are super easy to use. Please read the directions… you don’t want your goodies falling off. Clean the area with rubbing alcohol and wait for it to dry (a couple of minutes). Stick the tape to the hook and hold the hook to the door for 30 seconds. Wait a couple hours before you actually put anything on the hook.

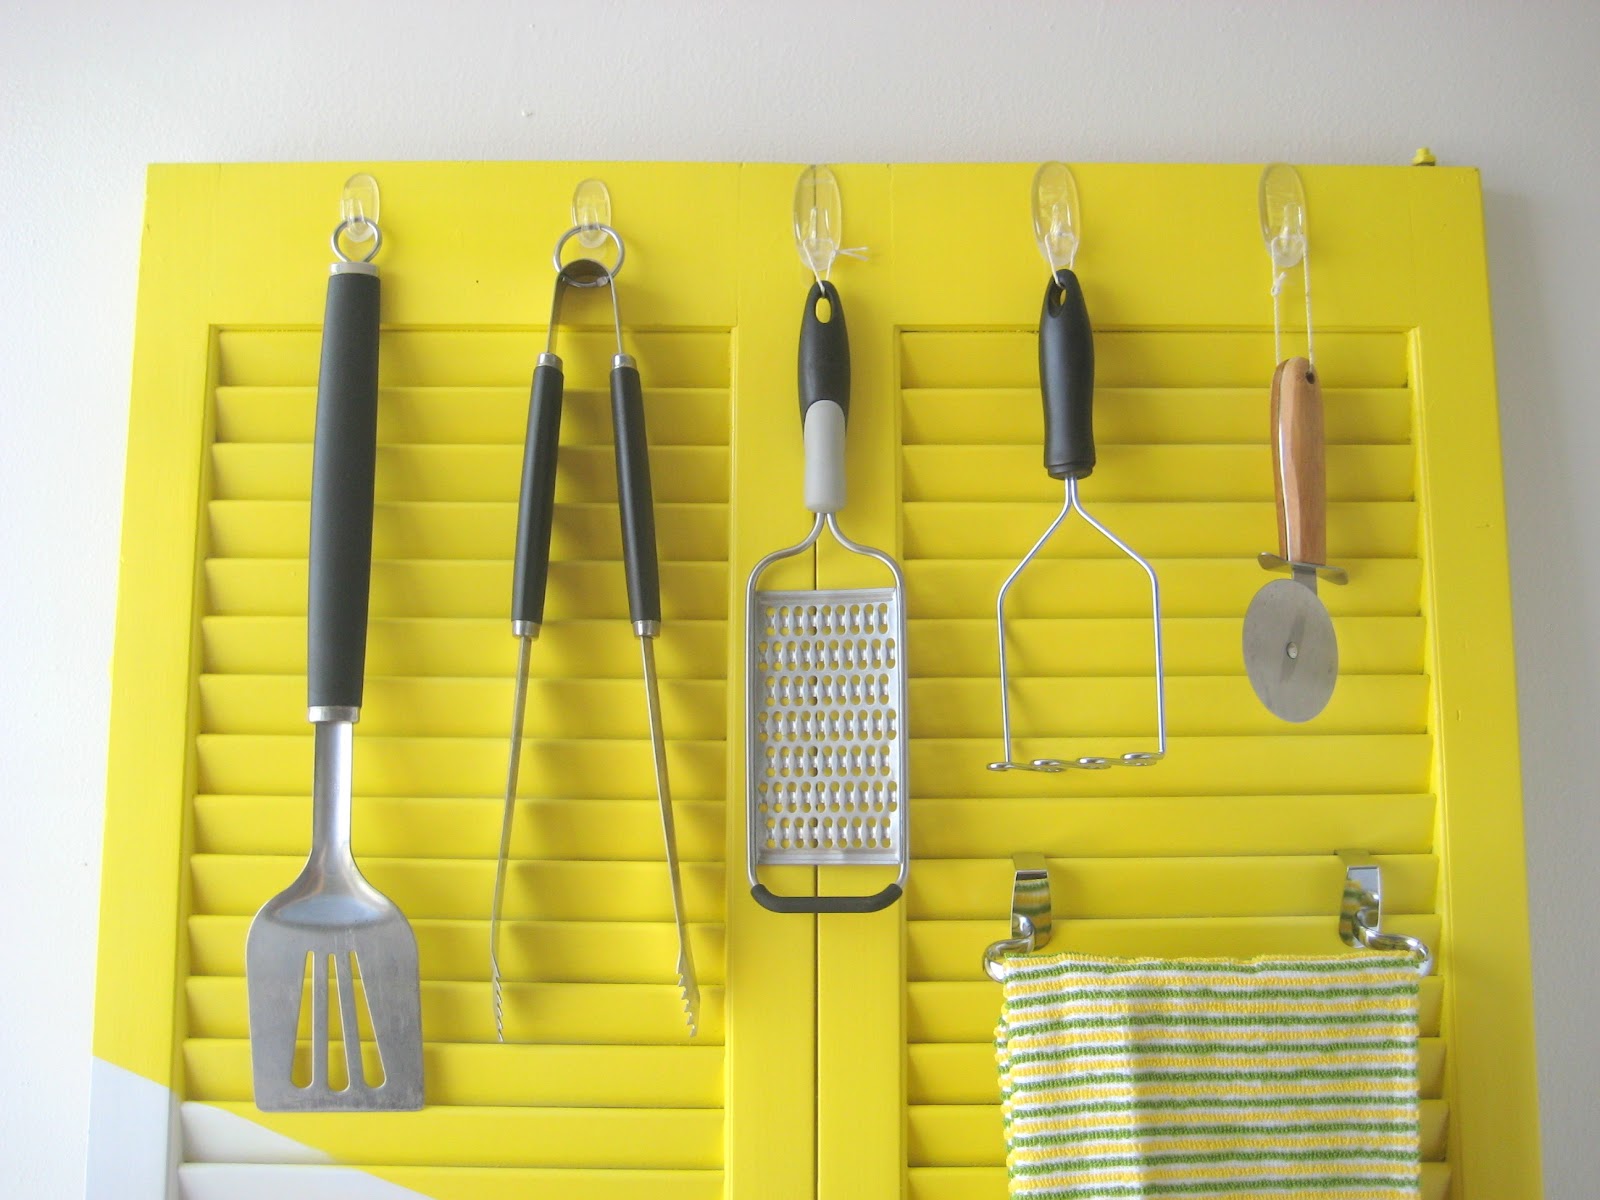
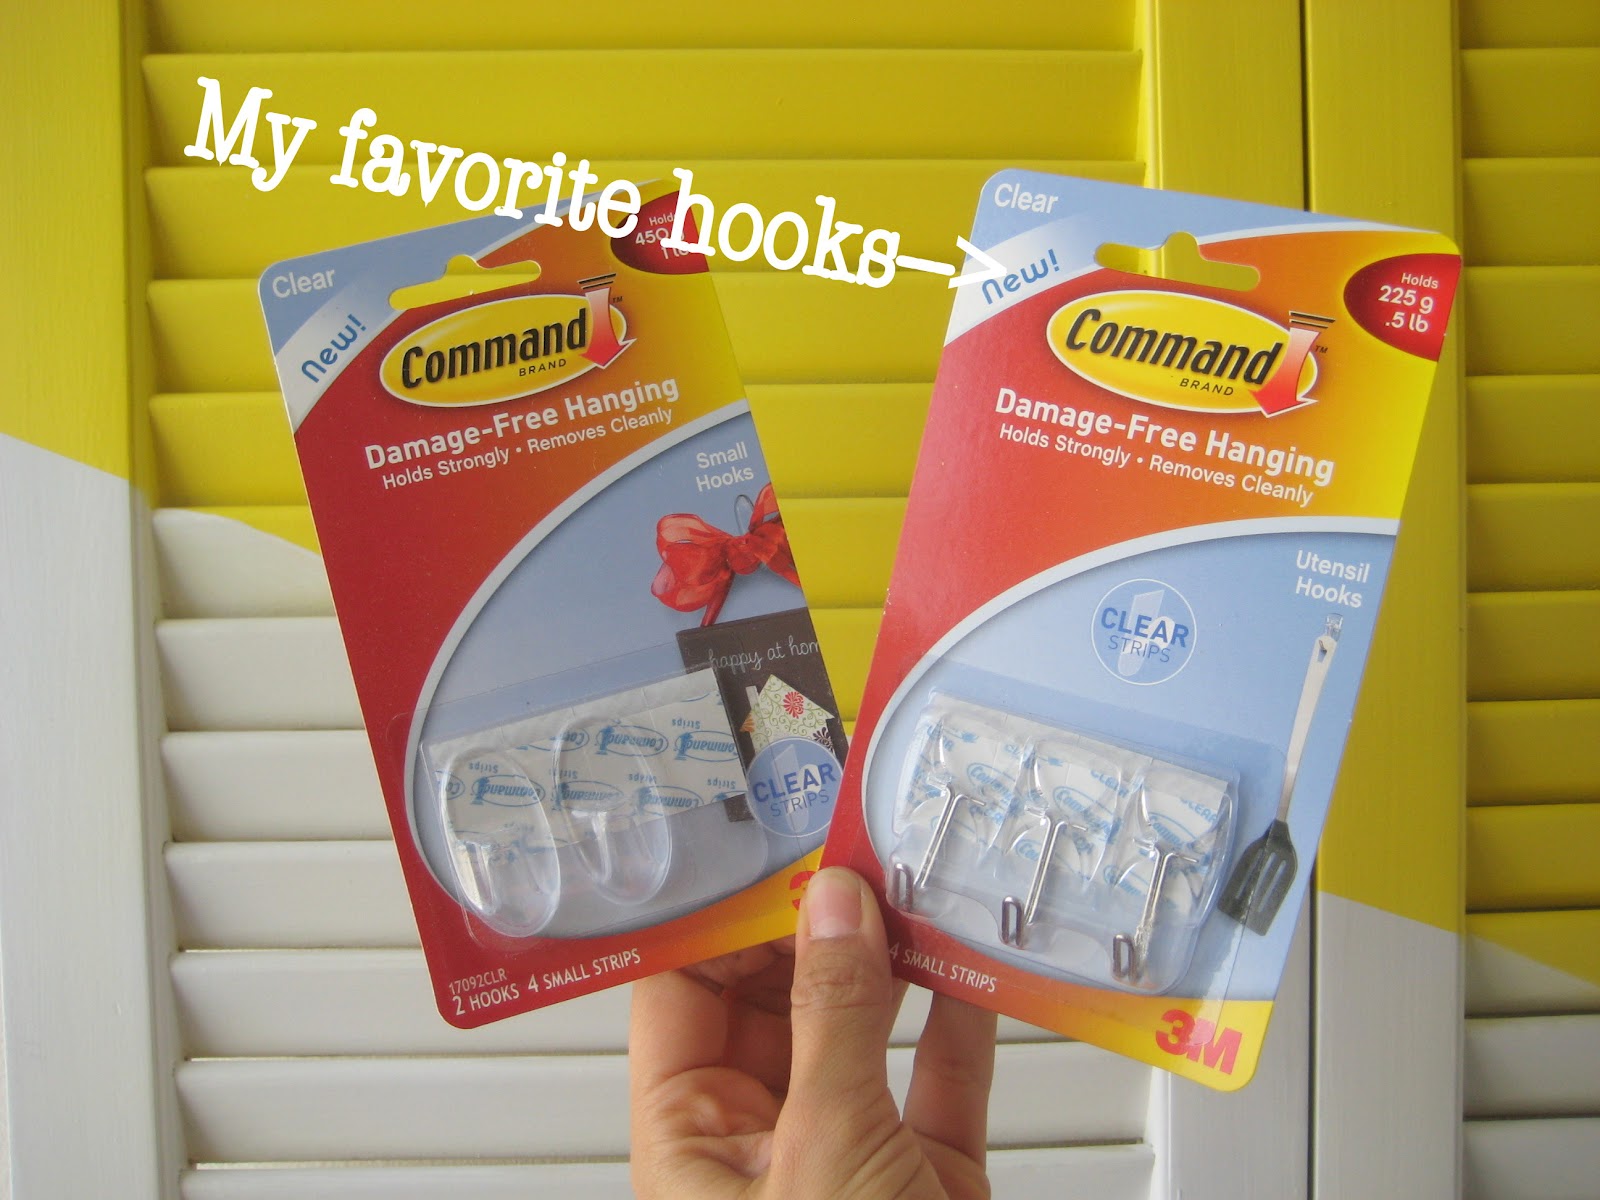
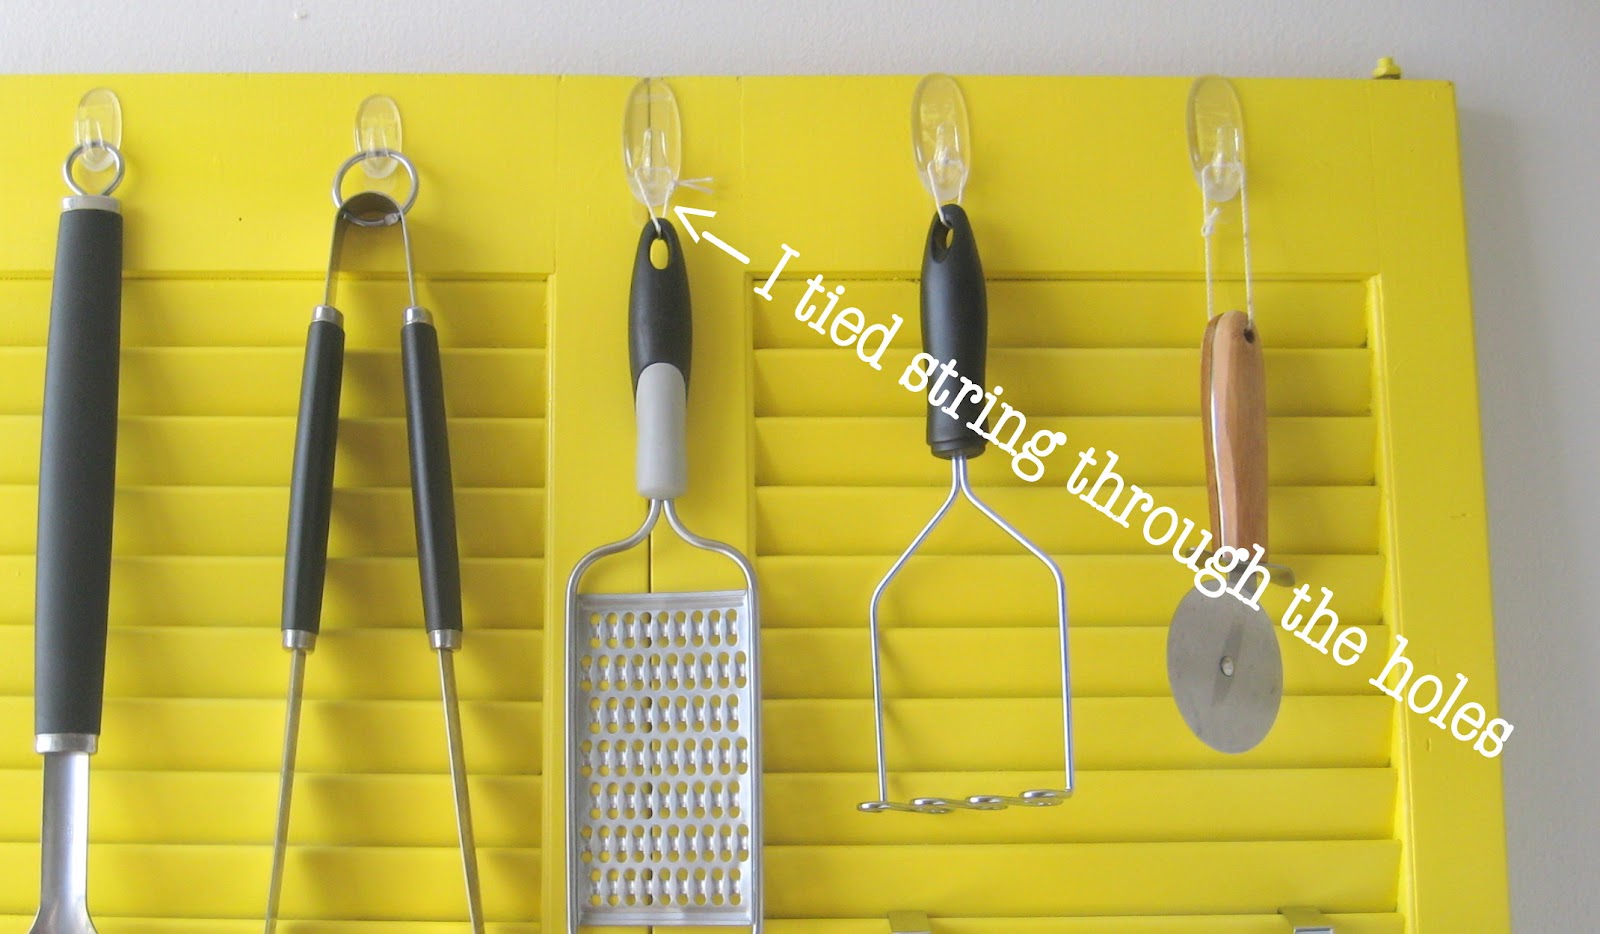
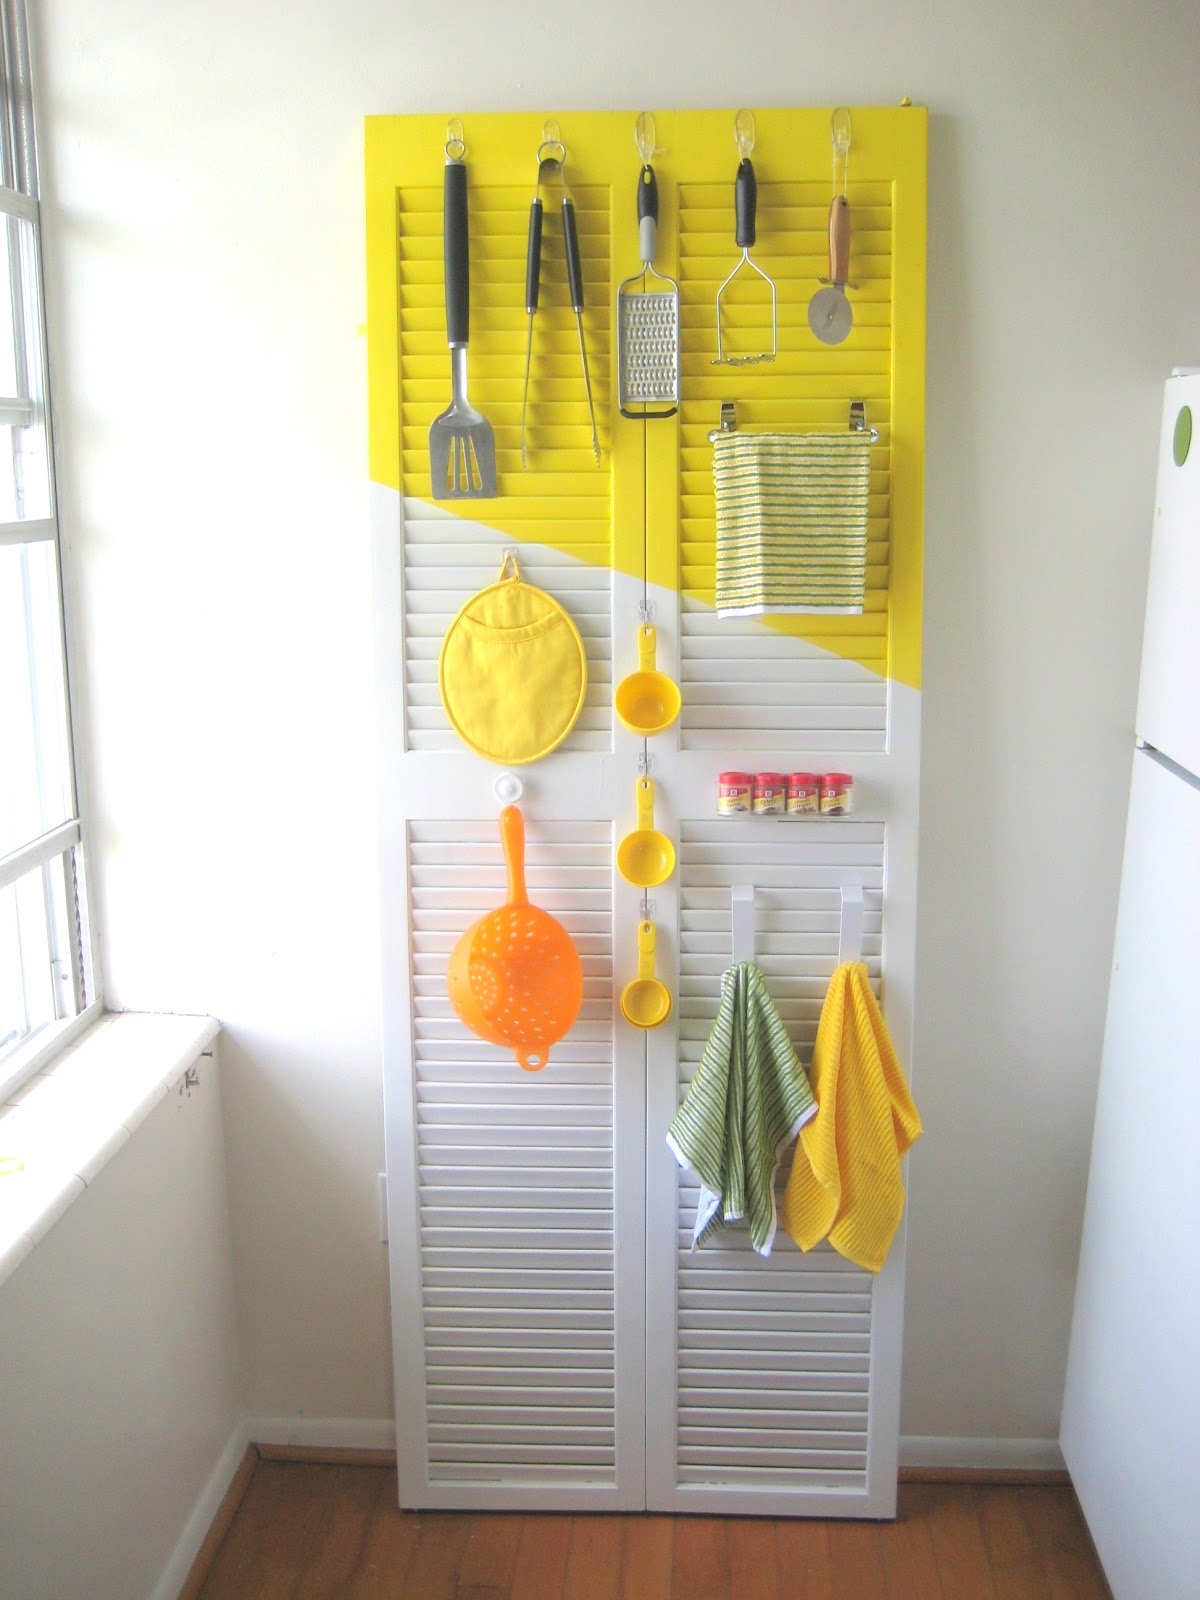
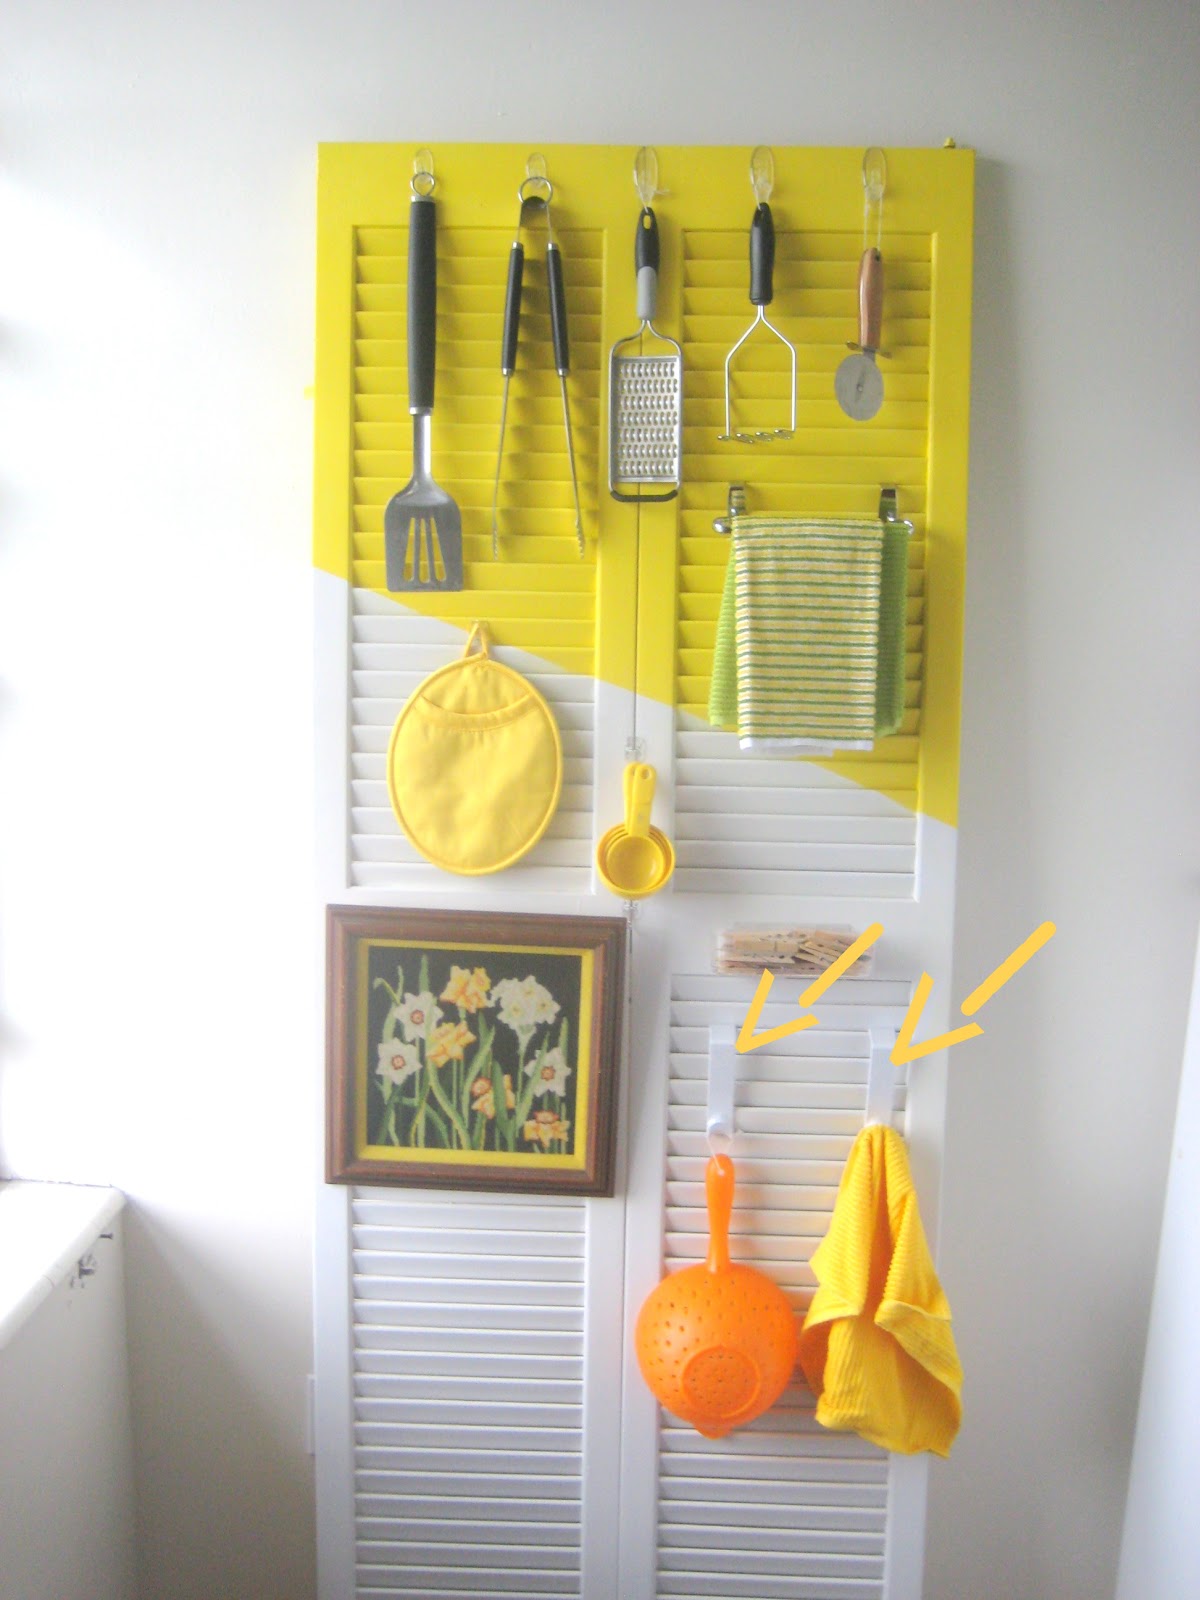
I started arranging the door from top to bottom using my Command Clear hooks. Since we only have one drawer in the kitchen, and it’s dedicated to silverware. The door is now storage for most of our kitchen towels. I stole the over the door towel rack from the bathroom and it slid on perfectly to the door.

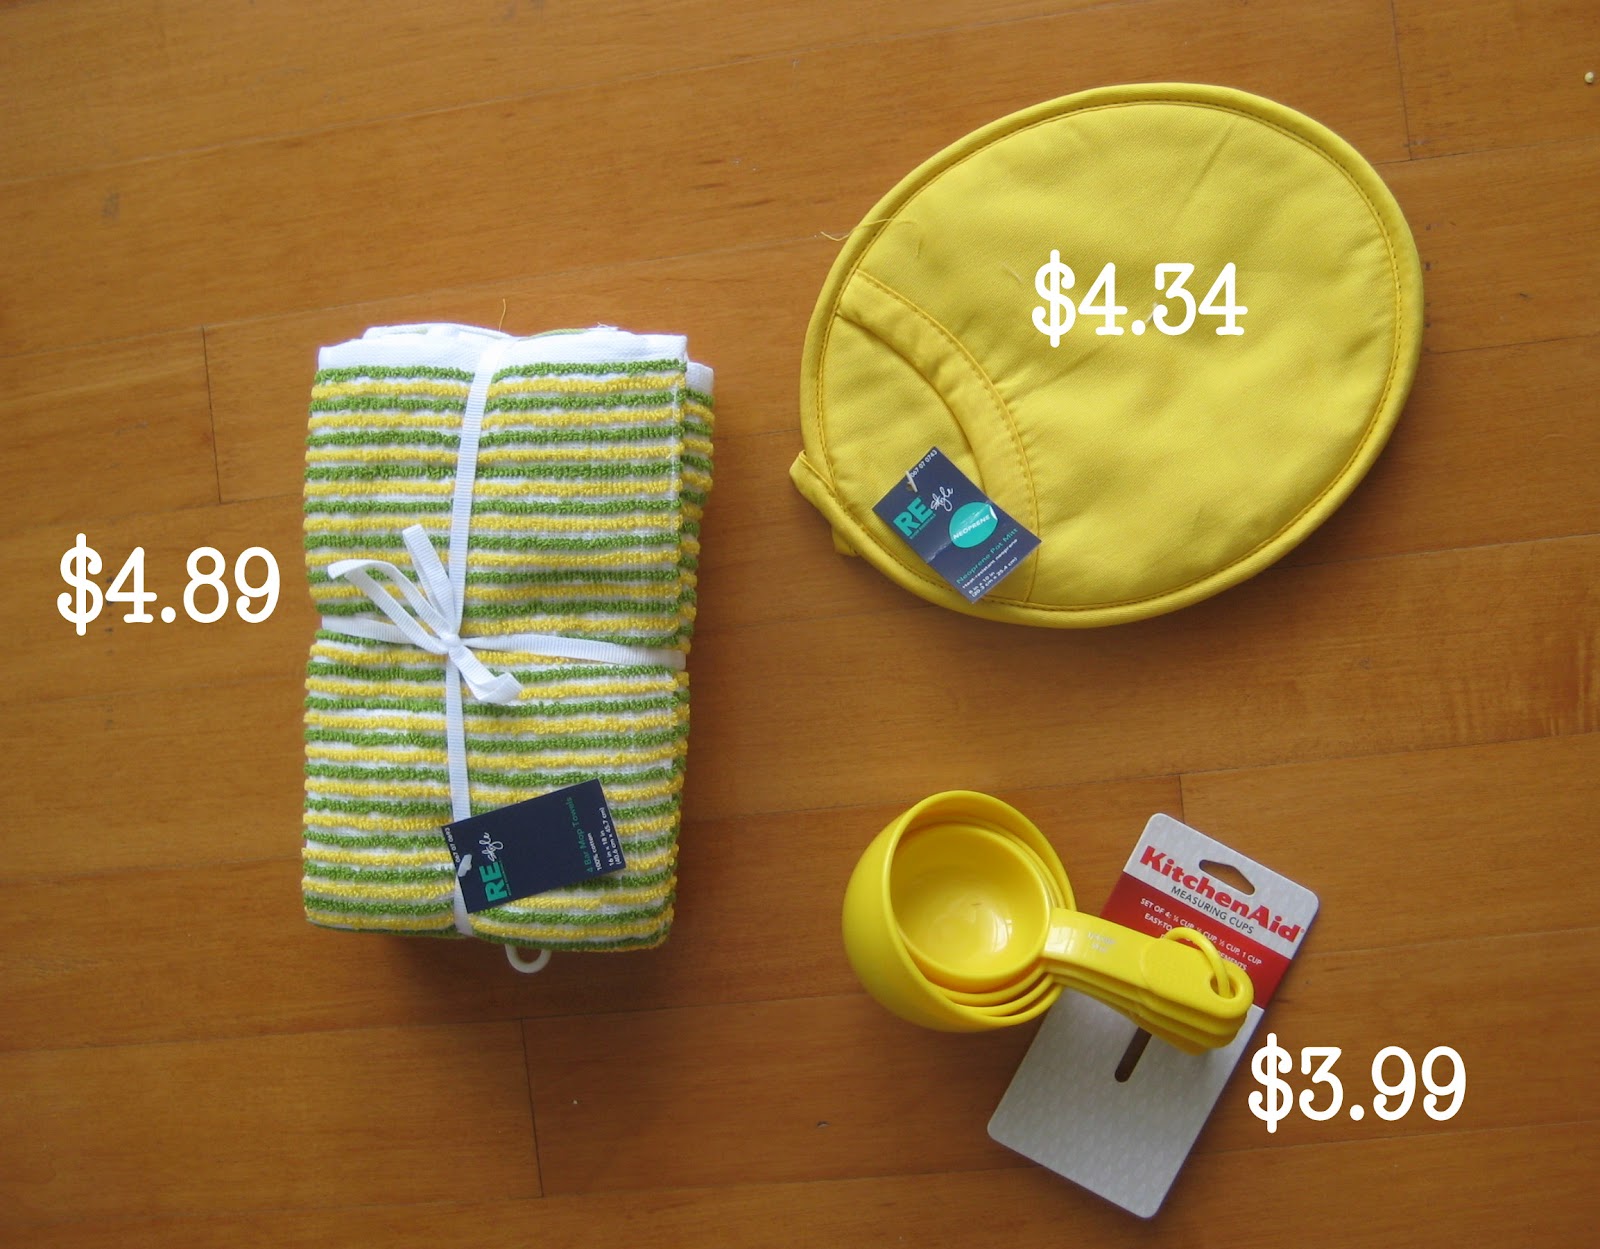
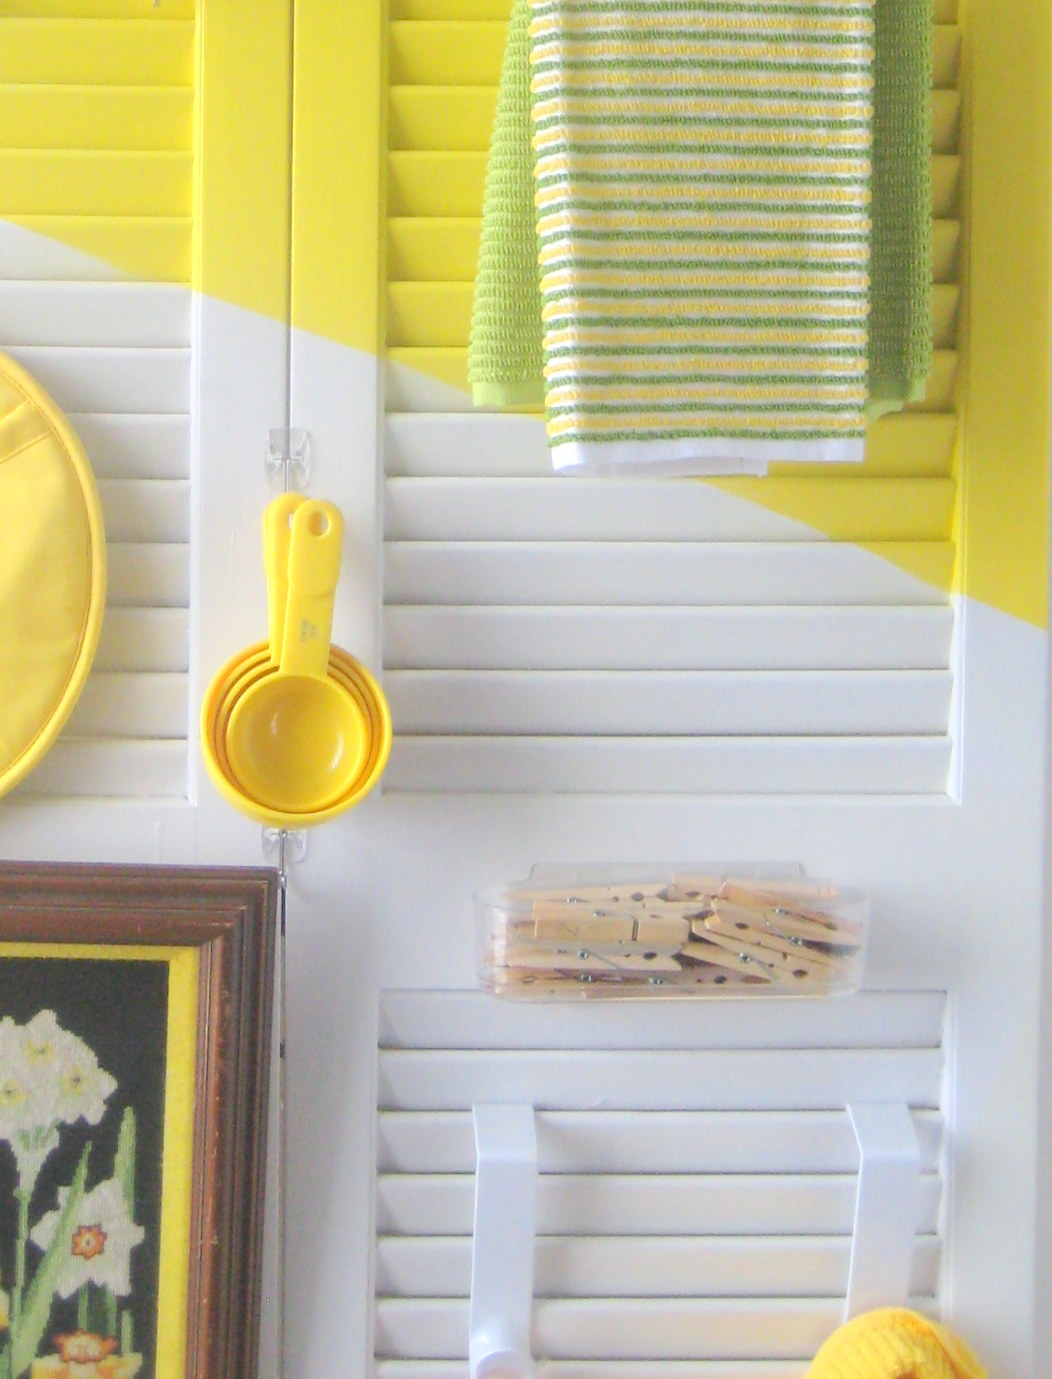
Then I was bad, and took a trip to Target and found this stuff… It’s the perfect yellow. What can I say 4 dish towels, a pot holder, and measuring cups for under $14 bucks that make my door a lot cuter, I’m sold… And we had a gift card.

Not to mention, Andy burned a dish towel the other night and our current measuring cups look like this… Rust? Crust? What is that brown stuff? Good things I got new ones 🙂

 I’m just trying to justify buying new stuff when the old stuff worked just fine. Moving on…

The utensil hooks ended up being the best hooks because they are a thin hook and can hold anything kitchen related. They’re the most versatile, at least in the kitchen…


For 3 of the top hooks…


Actually organizing the door was done over about 3 days… I wanted to make sure it worked for us, and I was using the new extra storage space to the best of it’s ability 🙂

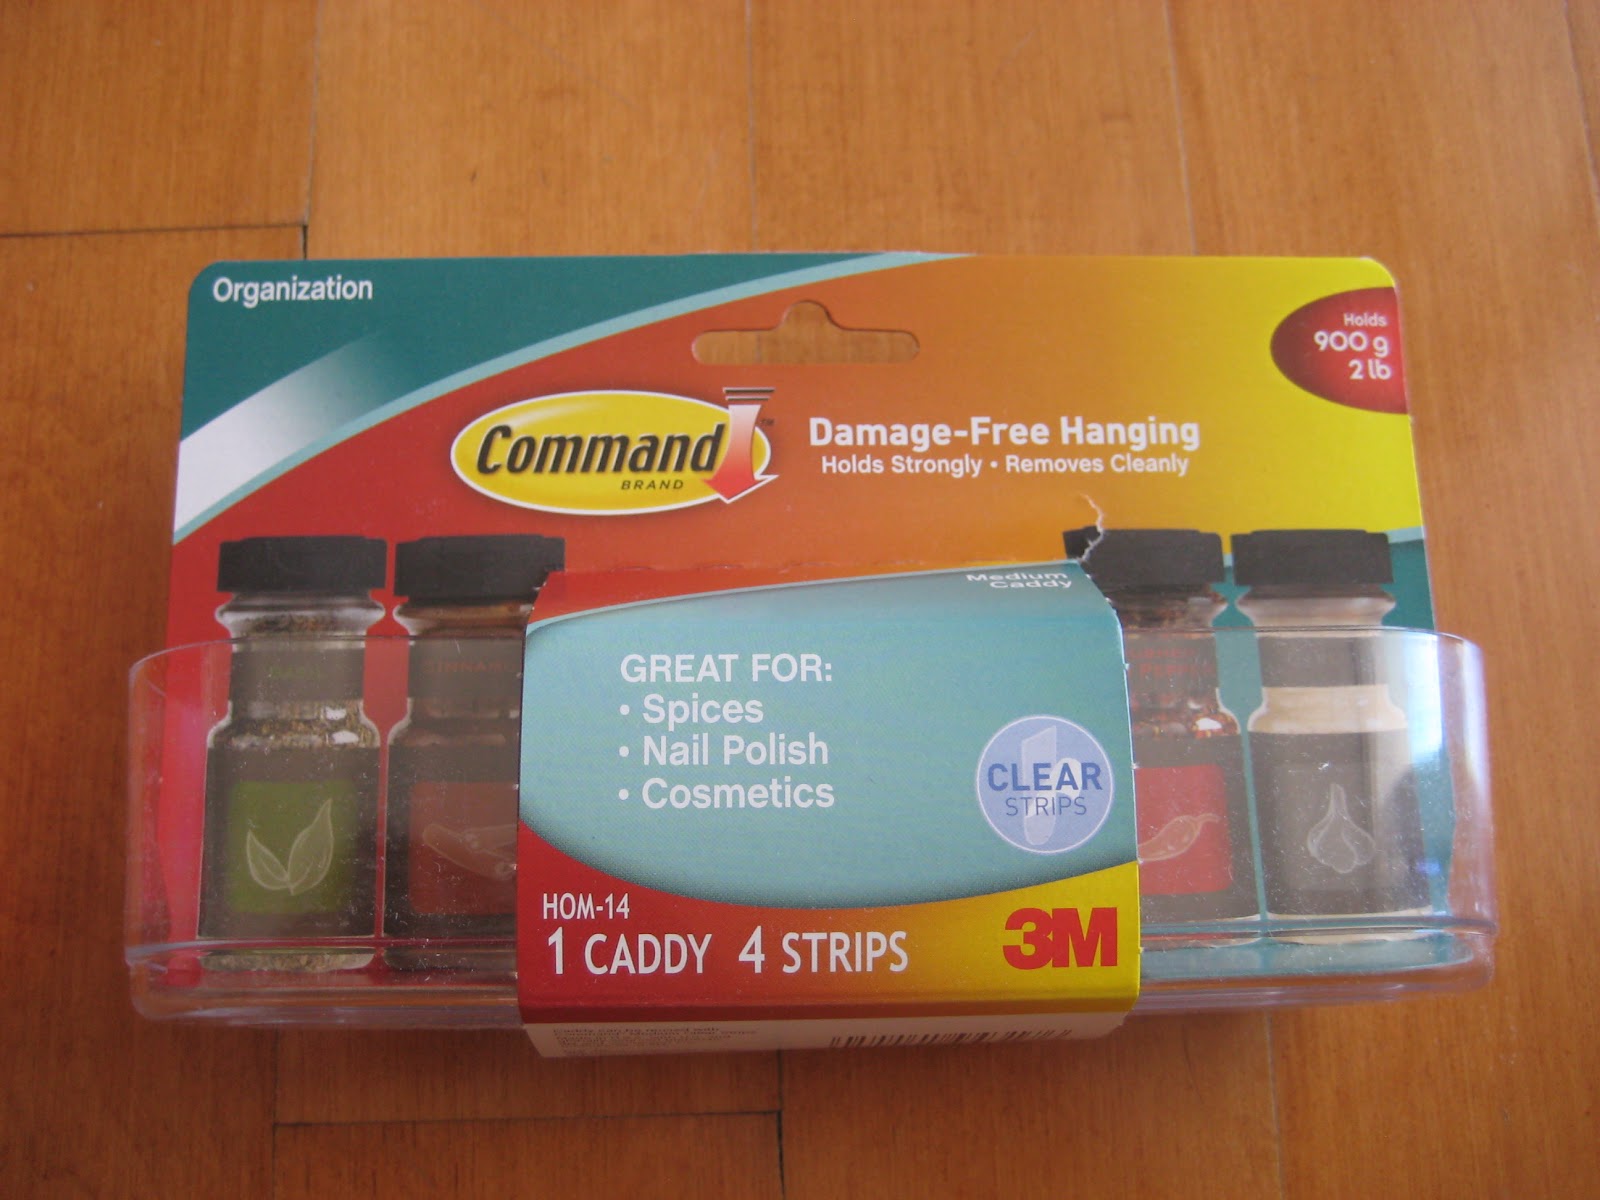
This was the first version…The cute little clear caddy perfectly holds 4 spices.

The little red ones sometimes get lost on this shelf…


But in the end it made more sense to put the clothes pins there since we use those more and they were in a zip lock in the top drawer of the dresser. The spices have a home.
My mom cross stitched the yellow picture and it was hanging on the wall before the door arrived. It worked out to just stick the picture on the knob that came with the door. Plus it adds a little more yellow and reminds me of my mom 🙂 The strainer was homeless, and although it’s orange I still like it on the door. The two hooks (with arrows below) are just your run of mill over the door hooks… I stole them from the bathroom.

I needed to cross #2 off of the list… find a container for bag spices in the large food cabinet. I found these at Home Depot for $3.88 a piece, and they would slide right on the shutter door. Or so I thought.

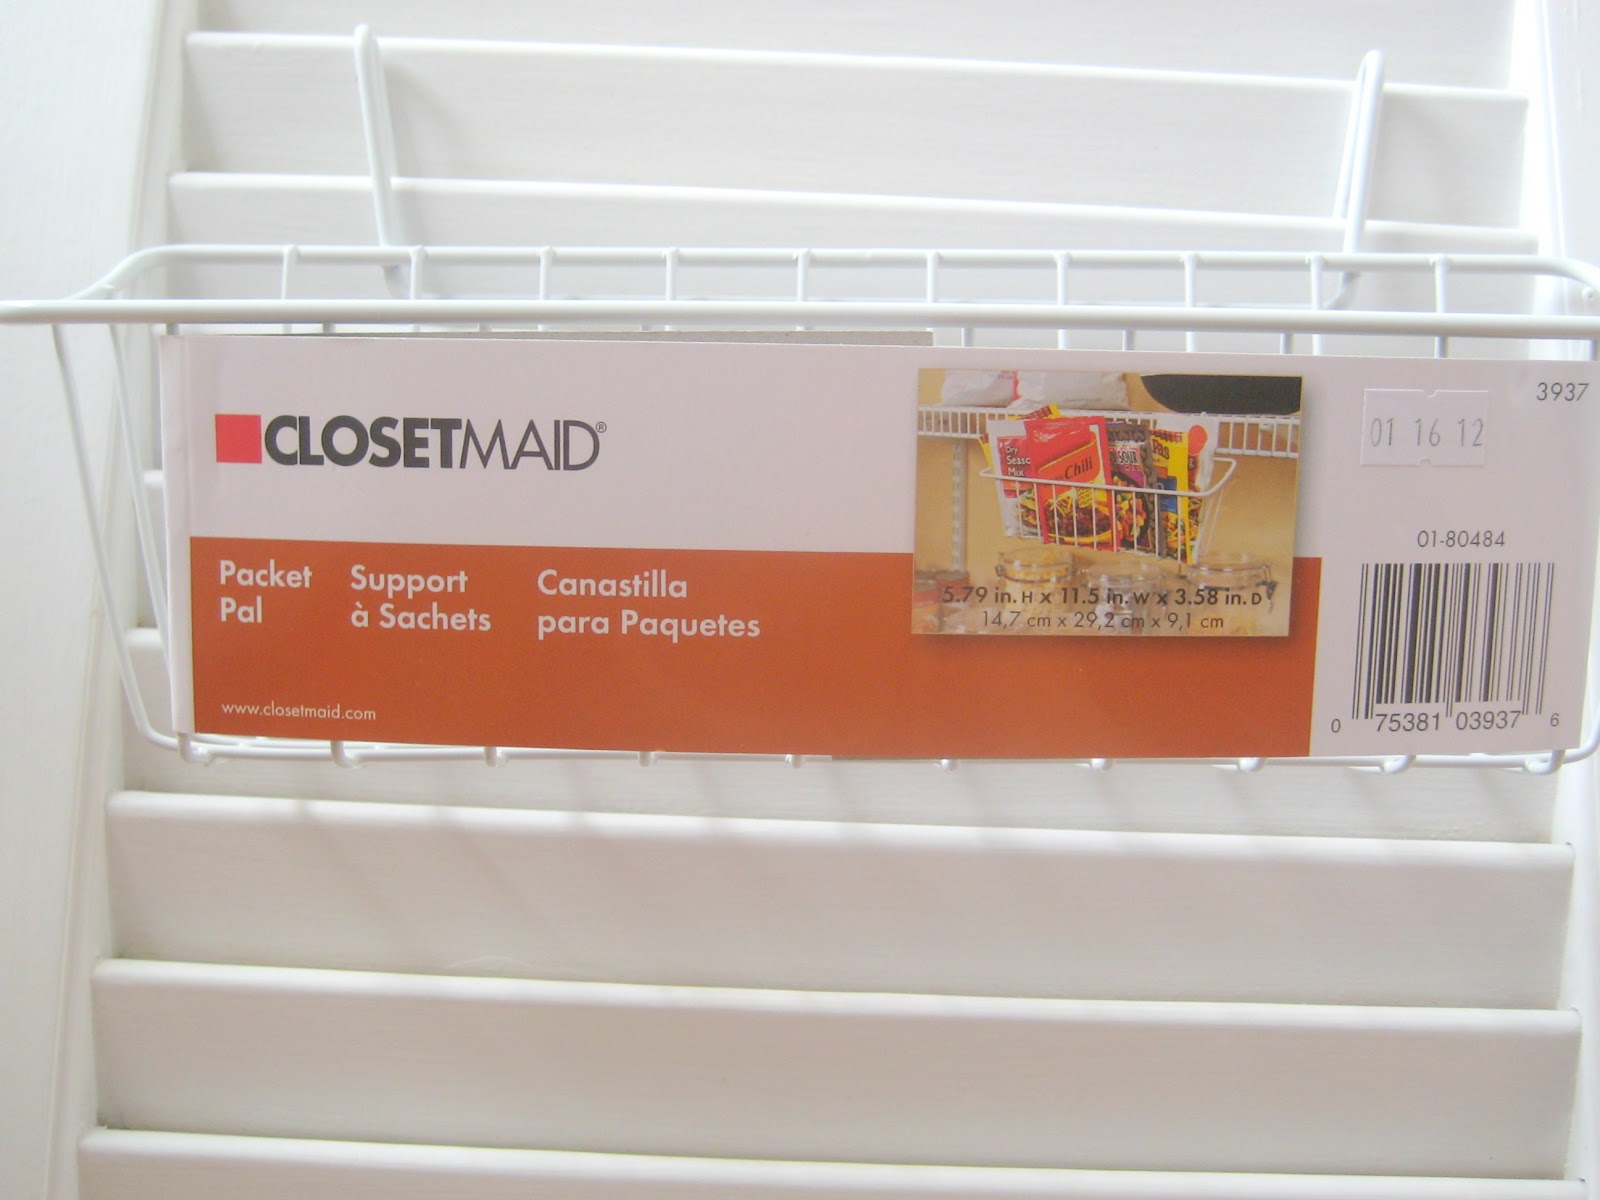
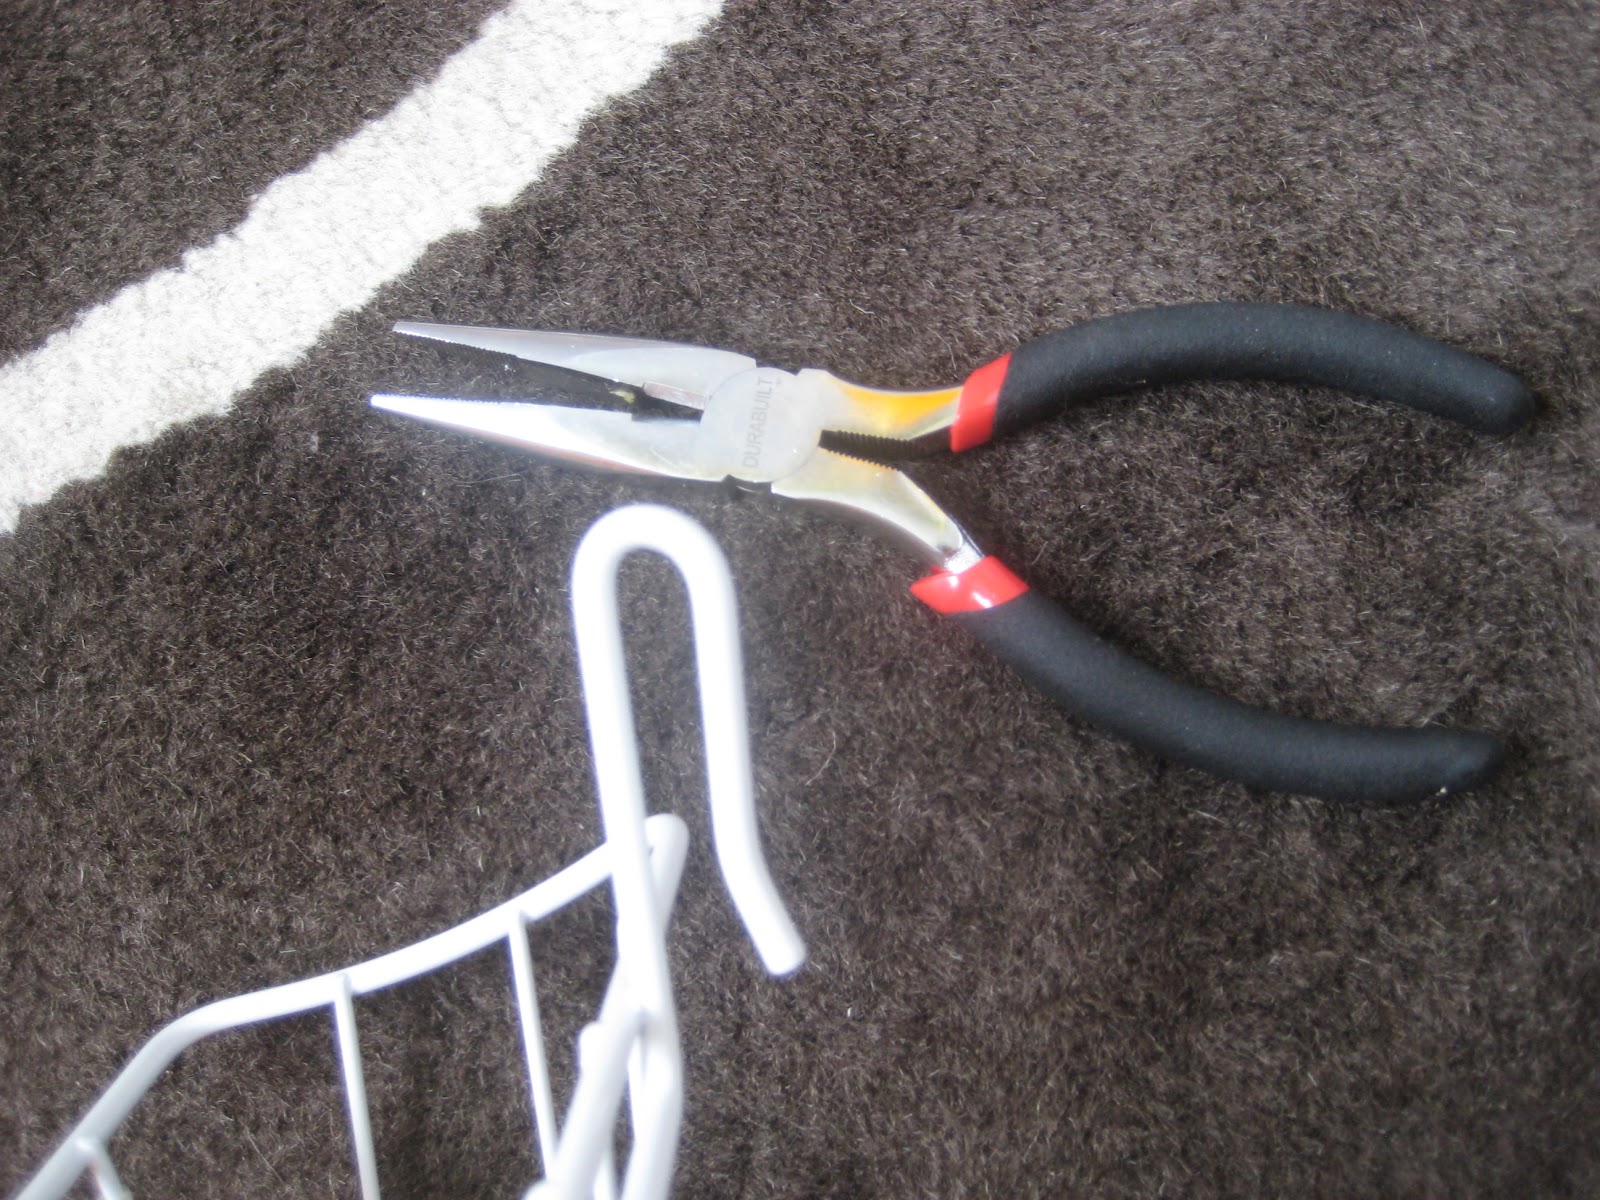
It didn’t take much muscle bend the wire out enough to make it go around the shutter…

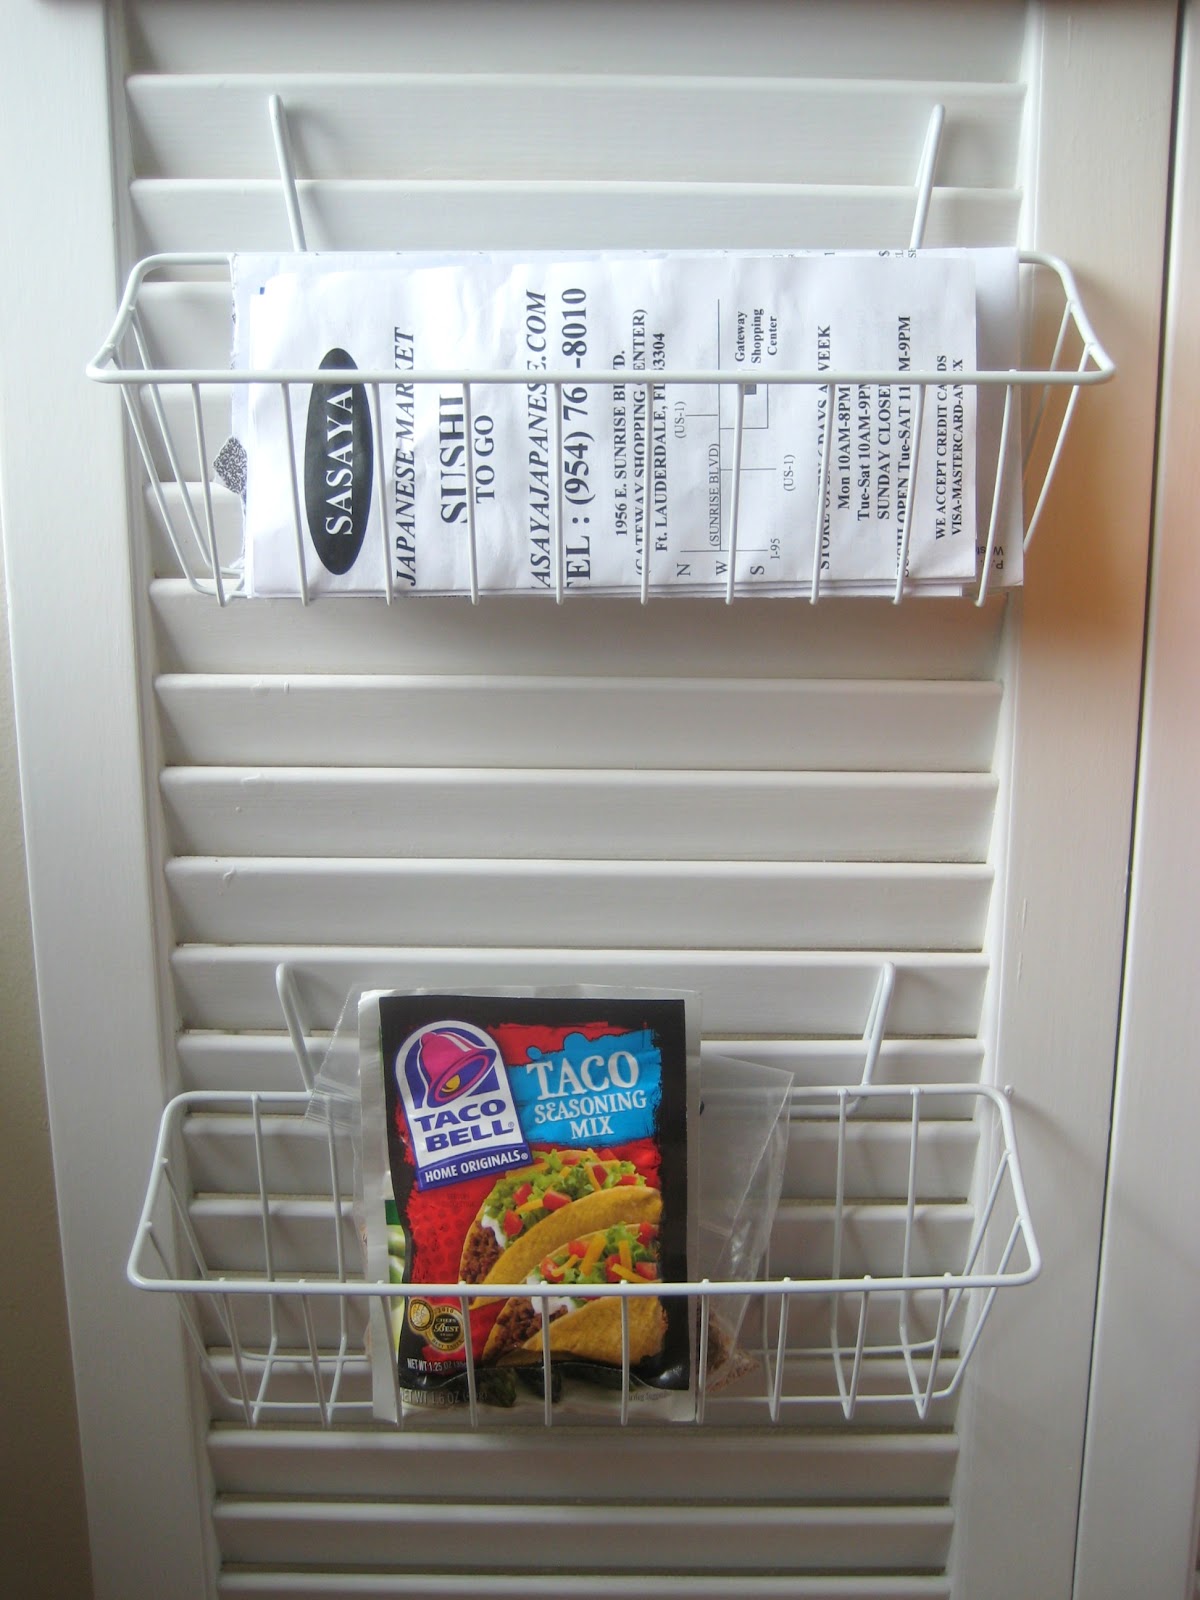
 My 2 little wire cubbies are perfect for the spice packets and menus!

And there you have it, the completed kitchen door organizer and every gosh darn detail about the thing. We love it. It’s functional, pretty, and seriously makes me consider having open shelving one day!
Cost breakdown:
  • Shutter Door- $5.00
  • Target goodies- $14.00
  • 2 cans of spray paint- $10.00
  • 2 wire baskets- $8.00
  • Command Clear hooks- free
  • Over the door hooks- already had
Grand total- $37.00
I might add one more Home Depot caddy under the orange strainer and yellow towel. Can’t waste space in this place! Have you been organizing anything lately? Have you ever used a door to help you? Have you ever been to a Habitat Re-Store? What do you think those orange-ish stains are on my measuring cups?

Filed Under: How to Decorate a Rental, Organization Tagged With: how to, kitchen, organizing, rental ideas

« C.R.A.F.T. made it to WP!
Part 2: WP themes, hosting options and costs »

Comments

  1. lourdes says

    September 22, 2021 at 11:15 am

    love this idea! can’t wait to try it at home, my kitchen is short on space 🙂

    Reply
  2. Joan Parker says

    January 19, 2020 at 5:22 pm

    I am looking for ways to hang my handmade wooden signs on a shutter door. What did you use to hang the daffodil picture?

    Reply
  3. Kim says

    January 16, 2020 at 8:12 am

    I have seen someone else do something similar, but using four panels instead of two and making a “box” with all four and putting it on wheels. Rather cute ideas. I am blessed with a lot of storage spaces, but when you don’t have a lot, this is a clever way to make more “storage spaces” and done well, can really be pleasant to look at!

    Reply
  4. Susan says

    January 3, 2015 at 12:55 am

    mine is going to be natural wood and pots and pans hanging from metal shower hooks

    Reply
  5. Hope says

    April 18, 2014 at 8:31 pm

    Has anyone used metal hooks to make this a pot rack?

    Reply
  6. sam says

    March 29, 2014 at 8:05 pm

    Have you ever been to a Habitat Re-Store?

    For the past year I’ve downsized from 4300 sq ft to 1100. Re-Store is the best place to donate anything you think someone else will find useful. Salvation Army also has benefitted from my project but Re-Store provides homes for others and who of us doesn’t want to help someone else up the ladder. And it’s the kids who truly are the beneficiaries of a new home……Love it that you mention them….thanks for a cool idea too. .

    Reply
  7. Ellie Williams says

    September 2, 2013 at 5:27 pm

    Where did you get a shutter door for $5???

    Reply
    • Jamie Dorobek says

      September 2, 2013 at 10:28 pm

      Habitat Re-Store!

      Reply
  8. JoAnna says

    October 7, 2012 at 4:04 pm

    I just LOVE this and being a renter needed more kitchen storage – I very well may copy you!

    Reply
  9. Jen says

    August 27, 2012 at 12:21 pm

    Wow, awesome job! I also have a tiny kitchen in my apartment. Kudos on figuring out a better solution. Inspiring.

    Reply
  10. Johnnie says

    August 2, 2012 at 3:54 pm

    Jamie, you are rocking it. If it is cool with you, I would love to feature this in my next 50+ roundup. Let me know! It will just be a thumbnail with a link to you for the details.

    xoxo
    Johnnie

    Reply
    • Jamie D. says

      August 2, 2012 at 7:47 pm

      Feature away 🙂 Thank you!!

      Reply
  11. Mary P says

    July 15, 2012 at 4:28 am

    Soooo, is the shutter thing attacjed to the wall somehow , or just leaning against? I love the idea but curious to know how to hold it up?

    Reply
    • Jamie D. says

      July 15, 2012 at 9:41 pm

      just leaning up against the wall!

      Reply
  12. lisa says

    May 14, 2012 at 12:42 pm

    What a fun idea! I’m in love with those rainbow handles on the kitchen utensils!

    Reply
  13. Molly Smith says

    May 13, 2012 at 7:21 am

    I do believe this is the longest blog post I have ever stayed with … and I love it. Your photos are awesome and ideas are great. I’ve never seen the Command caddy strips. Must have! Your ‘dipping it’ technique turned out perfect. The color choice from the vacuum is priceless. I had to do a double-take on the price breakdown. WOW
    -Molly

    Reply
  14. Holly @ My Sister's Suitcase says

    May 13, 2012 at 2:58 am

    This is so awesome Jamie!! I am currently renting too, and I love when people share ideas like this 🙂 I just featured you on our FB page for our “Shout Out” Saturday Night. Amazing idea!
    http://facebook.com/sisterssuitcaseblog

    Reply
  15. Heidi @Adventures of a Thrifty Mom says

    May 12, 2012 at 4:38 am

    This is a great idea. I love your color choice too! I’m going to pin this.

    Reply
  16. Karen says

    May 12, 2012 at 2:04 am

    Great storage! I love everything about it! The diagonal color, so cool! Just curious, how did 3M know about you? We live 4 miles from 3-M Center, (hubby works there) Is it someones job looking at Blogs? I want that job!

    Reply
    • Jamie D. says

      May 12, 2012 at 12:35 pm

      I made tyeninitial contact for awhile back for another project I was working on… You have to be squeaky 🙂

      Reply
  17. Marsha says

    May 11, 2012 at 11:50 pm

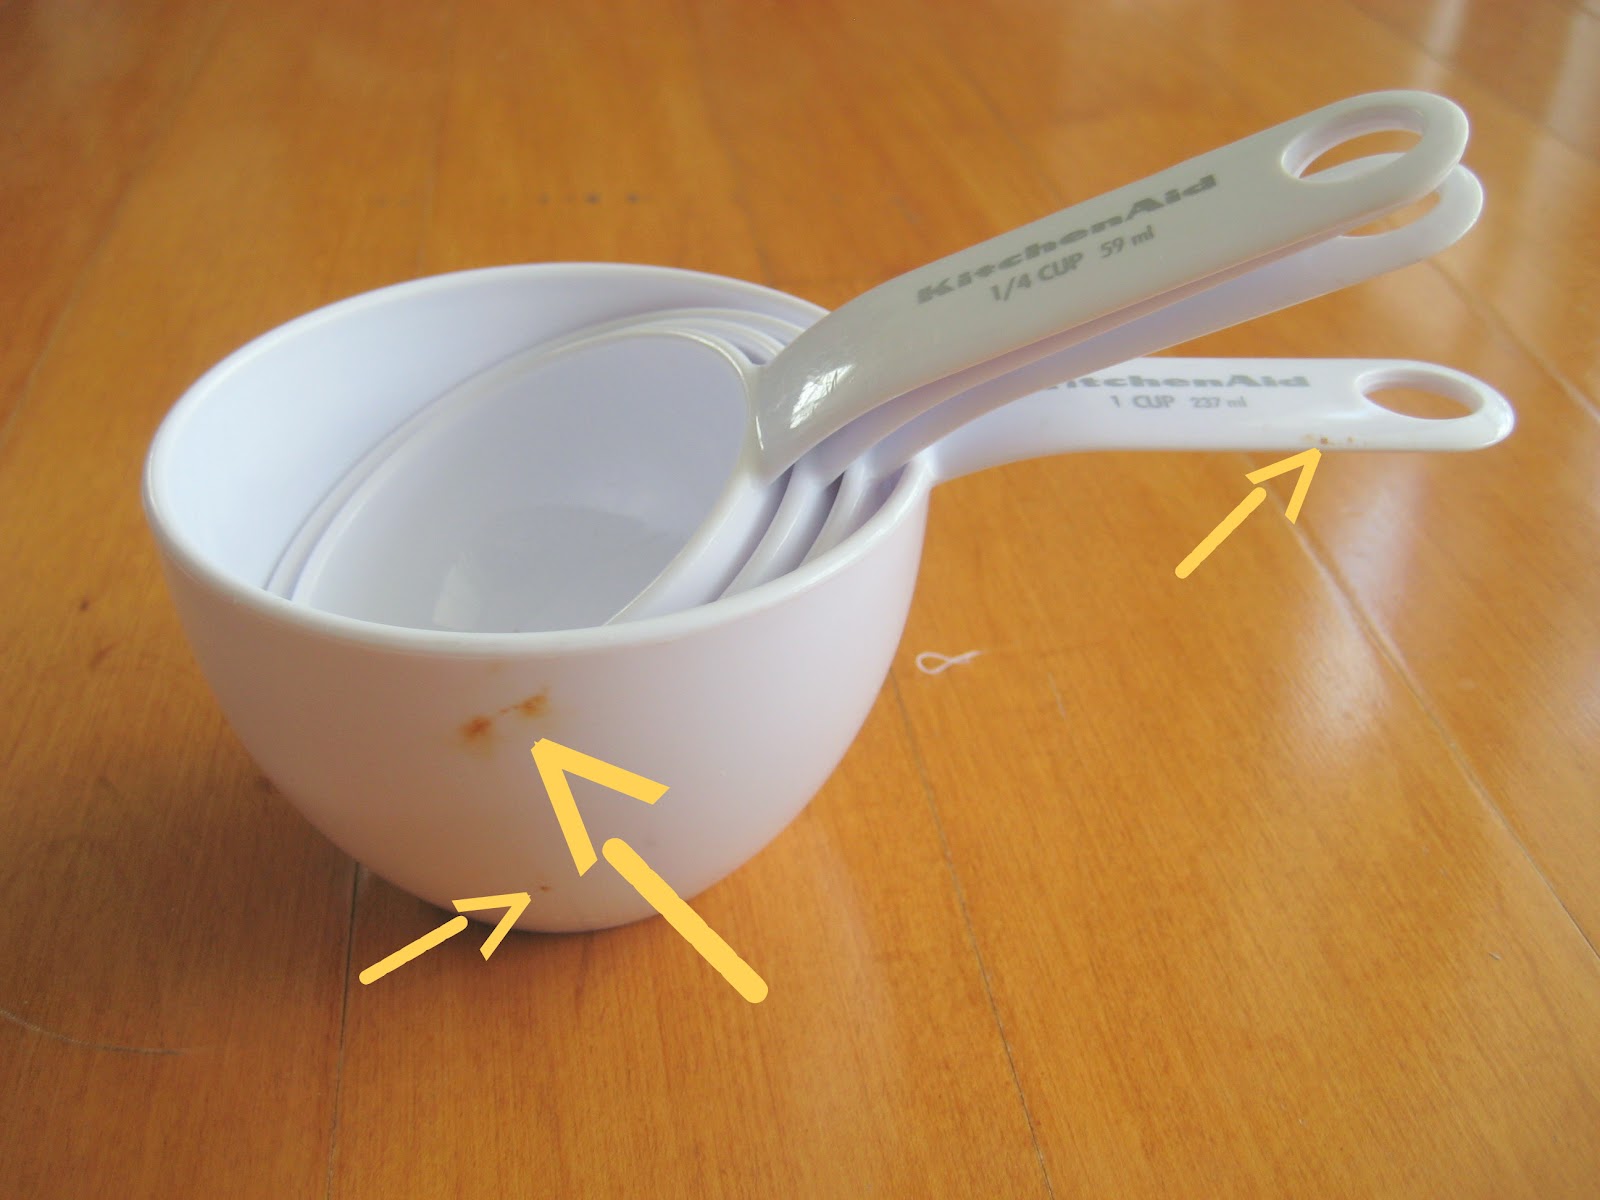
    Rust spots might be from dishwasher. When the plastic covers started wearing away on the dishwasher posts, I started seeing rust showing up on plates, cups, etc.

    Reply
    • Jamie D. says

      May 12, 2012 at 12:36 pm

      That makes sense… We definitely put that sucker in the dishwasher a few times! Thank you!

      Reply
  18. Heather says

    May 11, 2012 at 6:28 pm

    Wow! I’m super in love with your storage door. Great idea!

    Reply
  19. Christine says

    May 11, 2012 at 2:53 pm

    What a great post! This is such a creative idea and it looks adorable in your kitchen. I think it would work well for craft organization too! I am looking for a better way to organize my crafting disorganization 🙂

    Christine @ Projectsaroundthehouse.blogspot.com

    Reply
    • Jamie D. says

      May 11, 2012 at 3:49 pm

      You’re right! I think it would work great for craft storage!

      Reply

Leave a Reply Cancel reply

Your email address will not be published. Required fields are marked *

Hi, I'm Jamie!
I Create Really Awesome Free Things for your home, wardrobe, kitchen, and kids in Austin, TX with the sometimes help of Andy!
About>   Contact>
  • Email
  • Facebook
  • Instagram
  • LinkedIn
  • Pinterest
  • Twitter

Best DIY Costumes

DIY Costumes for kids
Easy Adult Halloween Costumes
DIY Baby Bob Ross costume
DIY baby costumes

Popular Posts

  • Easy Adult Halloween Costumes 39 Best DIY Adult Halloween Costumes
  • Healthy Valentines snacks 50 Valentines Day Sayings
  • Creative ways to give money as a gift 23 Creative Ways to Give Money
  • Cricut Maker tips 10 Things I Wish I Knew About My Cri...
  • DIY flamingo costume 37 Homemade Animal Costumes
  • Gender reveal piñata 25 Gender Reveal Party Ideas

© Copyright 2019 · All Rights Reserved · Privacy Policy