Need a fun summer activity? Try tye dying your nails!


What You Need to Tie Dye Your Nails
- glass bowl
- room temperature water
- toothpick
- a few nail polish colors
- tape
- nail polish remover
How to Tie Dye Your Nails
Step 1- Paint a base coat
Paint your finger nails a base coat. I prefer white, but any solid light color will work.
Step 2 – Tape
Use clear Scotch tape to tape around your nails the best you can. Annie used clear tape so it is hard to see!

Step 3 – Bullseye
This process needs to be done quickly to avoid letting the nail polish dry. Fill your bowl up 3/4 of the way with water and drop your nail polish in one after the other to make a bulls eye pattern in the center of your plastic cup.

Step 4 – Multiple colors
Continue forming the bulls eye until you have 6- 12 circles in your bulls eye.
Step 5 – Toothpick Design
Use a toothpick to create a design with the nail polish bulls eye.
Step 6 – Dunk your nail
This step needs to be down quickly or else the nail polish will dry. Place your nail, palm up and dip it into the center of the bulls eye. Turn your nail over under the water and pull it out.
Step 7 – Repeat
Repeat steps 3-6 for each nail. You have to make a new bullseye for each nail.
Step 8 – Clean up
Use nail polish remover to clean up around your nails. Or take a hot shower and peel the paint off with your fingers!
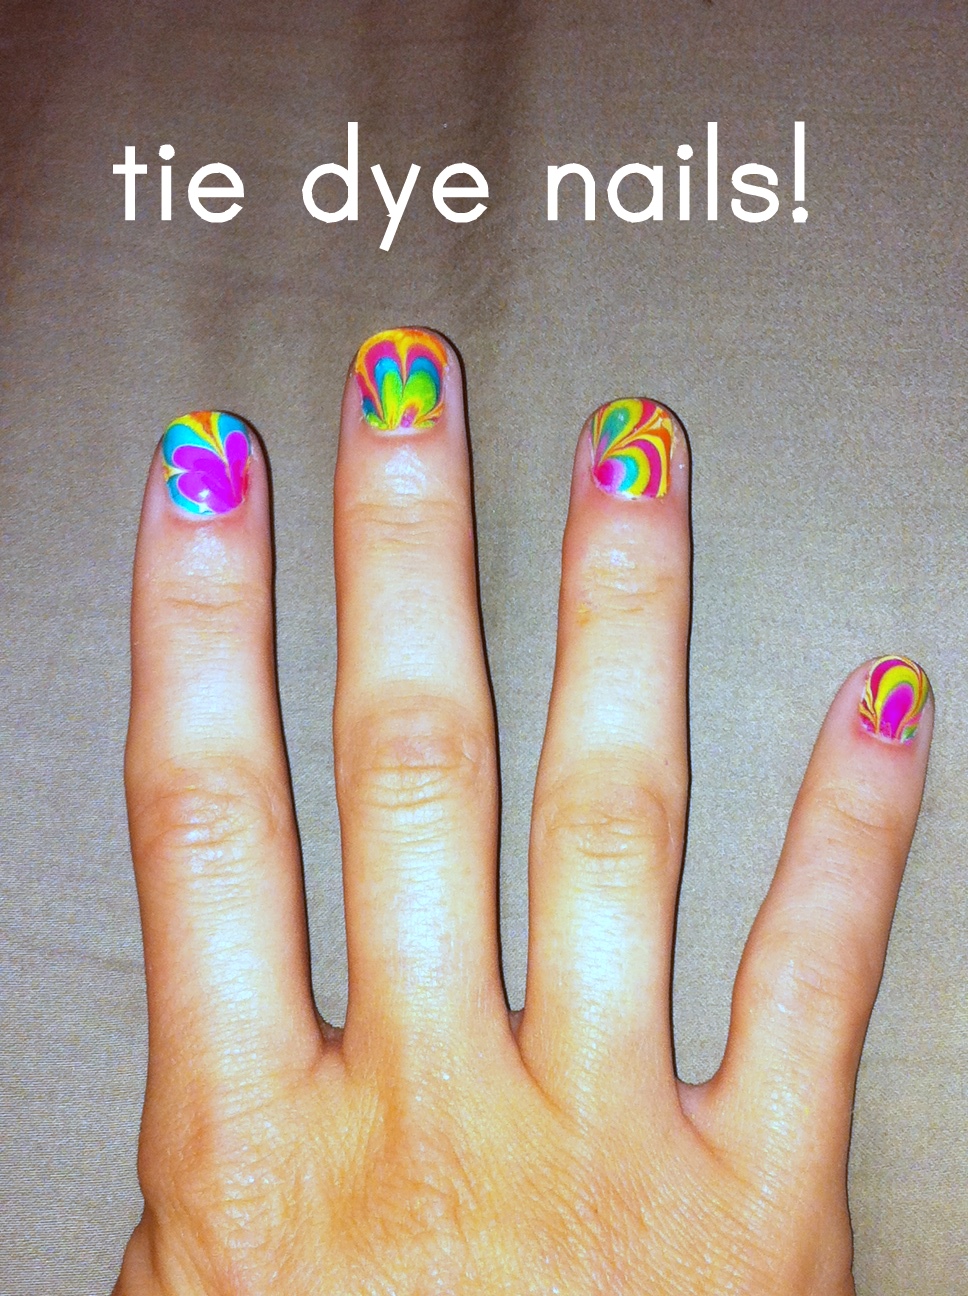
PS: These are Annie’s pictures and awesome nails, not mine.

Comments & Reviews
Here are a few tips and modifications to make life a little easier with this:
1) Use lukewarm, aka room temperature water.
2) Use dixie cups so you don’t damage your dishes.
3) Instead of using tape, use a makeup brush to “paint” vaseline around your nails and as far down your finger as it will be submerged in the water. This way, you can simply wipe it off on a paper towel and then use a toothpick to remove the nail polish that is close to the nail so you don’t damage what you want to remain.
Thanks for the tips 🙂
also, when you use your nail polish it needs to be a great brand…a.k.a not cheap nail polish. when the polish hits the water it needs to spread apart as soon as you drop it in the water. when you dip your nail in make sure you line your nail facing down in the water and when you do this keep your nail under the water for about ten seconds. take a toothpick and swirl around your finger in the water to pick up the excess polish off the water….this makes it so much easier
great tips! the good nail polish is a MUST!
You can also dip two nails at once. Major time saver. You don’t have to drop the nail in the center. I find the design I like the best and dip there. Where ever u dip is the design that will b transferred. This is super cool designs and gets many compliments! I’ve been doing this for about a year. I love it! I also use the vaseline. I use bottled water, as I find tap water doesn’t work well, causing the polish to sink or dry too fast. I bough me a small Tupperware container that I use for this purpose alone. I use it over and over. White base coat brings the brightest nail color design… Another tip, if your polish is thick and hard to drip, use a straw and drop a few drops (2 or 3) of polish remover into the bottle and shake it up. This really helps to thin it out to make it more manageable.
Just after Easter I had my toenails and fingernails painted in Easter Egg colors. I did have the right one match the left but I have pink sparkle, lime green, bright yellow, orange and blue (robin egg blue). I went to the salon to have them done. After I bought some cheap nail polish at the store and took it to CA with me to see my granddaughter (she was being baptised at 8) and we painted her nails and I left the polish there so she could do it again. My toenails still look great but i lost the color on my fingernails long ago. It never lasts on my fingernails. I got a compliment on the nails just after got it down when I went to a fast food place to grab something before I headed to another place. the tie dye look is neat, but sure looked sloppy to get the stuff off. So that is acrylic paint rather than nail polish?
What if your nail polish doesn't spread out like oil? We weren't able to make a bulls eye pattern….
Try using distiller water
You're welcome! Thanks for letting me know… Your nails turned out great 🙂
Thanks so much for posting this! I decided to try it myself. If you're interested in seeing my process/results check out http://festobsessed.com/2012/04/tie-dye-nails/
Seriously thank you for this guide. I never thought I'd be able to make my nails so cool, so easily.
-Lindsey
umm why not just put the polish on the nail and use a toothpick or something to marble them?? Does it create a different effect or something?
It is a lot harder than it looks. My daughter and her friend tried this and it never really worked, so they gave up. Maybe there is an easier way.
This is so very cool! Can't believe how good it looks! I actually saw this as a Youtube vid before I saw this but was linked by a friend as they know I adore this sort of thing!
Looks awesome, will give it a try soon 🙂 xx
Just found this via pinterest and tried tonight. How in the heck did you get it to work? When I put my fingers in the polish blurred all together. Any hints?
The same thing happen to me before I read this and I only got one nail to look good! Also the colors didn’t spread in the plastic cup I used. But this tutorial made me want to try again! Tips??
Thank you for the vasaoline and chapstick tips!
You can also put Chapstick around your nails and it wipes right off. I would suggest having lots of Qtips and toothpicks available because this can get messy and having all the tools ready helps a lot.
Adorable!
These turned out so CUTE!! Love the colors you chose. Thanks for the tips…I also enjoyed the video!
Wow!!! Great tutorial!
I have been told that if you put vasoline around your nails (instead of the tape, the polish won't stain your fingers and wipes right off.
I used Vaseline, and it really did work. The polish just peeled right off 🙂
I love the colors! Thank you for this great tutorial!
This is such a perfect/fun sumer activity. I may just have to have a girl's night with my roommates and make our own nails tie-dye 🙂
These look awesome! I can't wait to try this! We would love for you to come share this at our "Strut Your Stuff Saturday" link party! http://sixsistersstuff.blogspot.com/2011/07/strut-your-stuff-saturday-week-2.html
Love,
The Sisters @ sixsistersstuff.blogspot.com
I get so excited when I see something new! I always have my toes painted and this is fun for the summer! I'd love it if you shared this with WorkShop Wednesday this coming wednesday. It would be a nice addition to the party!
My 12 year old will LOVE this!! How fun, thanks!
Dumb question of the day – when you say repeat for each nail, do you mean the entire process with the polish drops, etc., or just dip each nail separately?
the entire process including the polish drops its long and tedious but but it looks really cool in the end 😀
It’s a fun process!
Okay, that's totally awesome!! I have to attempt it now! 😛
Oh man, I tried this and failed super miserably. I only got one nail to look decent but that one nail actually looks super awesome. Maybe I'll try it again. 🙂
There's so much I apparently don't know about the girlier things in life! So stinking cool!
I haven't actually tried it yet… hopefully, this weekend Annie will give me a manicure 🙂 {fingers crossed!} I'll let you all know how it goes via facebook!
That is so cool! I can't wait to try.
I love it! I can't wear colour on my fingers, though, because I can't take it off! Polish remover irritates my skin. I colour my toe nails, since I can just stack the colours and let it chip; I'd love to do this but I am sure it would be very akward dipping the toes in the water!
Try this then. Make up the polish bull’s eye and instead of placing your finger in the polish, place a circle of plastic ( cut up baggie works well ) over the polish. Pull the plastic off the water with a pair of tweezers and place on a paper towel, paint side up to dry. This takes about a day. Then cut the dried polish circle to fit your nail shape. ( you should have enough to do five fingers with one circle ) Put on a base coat to act as glue, while the base coat is still tacky, peel off polish from plastic and put on nail. Let dry & put on top coat.making sure to coat the tip of your nail and the underside of tip also. Enjoy!
After it’s worn a while ( about 1 -2 weeks) it will chip off or you can pop it off with an orange stick, leaving only the base coat that is clear behind.
Hope this helps you out.
What an awesome suggestion for someone who doesn’t tolerate nail polish remover! Also fo the rest of us to try as well. I may have to try this with a larger size bowl and ziplock as some of us struggle to do both hands equally as well.
That looks so cool!!!!
I will have to give it a try sometime! http://runwithglitter.blogspot.com/
How neat is that! I can't wait to try that! Thanks for the great info!
ooh that looks fun!
This summer I've been loving all of the cool colors, blues, greens, purples. Really I love them all!
Please don’t try this.. I tried it myself and got fingernail polish stuck on my fingernails and skin..
Did you remember to tape your nails? Also if you dip a Q tip in nail polish remover you can clean around the nail without ruining the design.
While I myself have never tried it ( because I wasnt sure how to do it til now,lol ) several ladies around my area have done it and loved it!
don’t use tape ,take a Q tip and vasoline and put it all around your nail and finger ,the polish can’t stick on it. Use a good amount making sure you don’t get it on the nail.
Does that actually work? Tape seems difficult and I wanted to know if vasoline really worked be for I did it.
Hi!! Just wondering whats a Q tip?? Thx 😀
a Q-tip is a little stick with cotton stuck on both ends. People usually use them to clean ear wax out of their ears, but they can also be used for things such as removing nail polish and fine-tuning designs that need the edges cleaned up. 🙂
Sweety,it says it will get messy….
Everyone,i would advise trying it,besides,life wouldn’t be fun if we couldn’t make a mess!
thats why they said use nail polish remover duah girl!!!!!!!!!!!!!!! can you read are you stupid or something!!!!!!!!!!!!!!!!!!!!!!
Do you really have to resort to belitting name calling? I thought we were here to offer help not criticism. Have a nice day ♡
You dont have to be a jerk not everybody is as up to date as you obviously are
This wouldn’t work for me. It all got stuck to the tape instead of my nail..