Reupholstering a chair is a daunting task, at least it was was for me. I stared at this crusty, free thing (read more about Andy’s collection here) for 6 months before I got up the courage to learn how to reupholster a chair. It’s a smelly, messy project, but seriously, not that hard or time consuming.
Should you keep the springs when reupholstering a chair?
Short answer, no, do not try to save the springs in an old chair.
The first decision to make is are you going to attempt to keep the springs or gut the entire chair and use the plywood + foam method? The nice Jo-Ann fabric lady convinced me to ditch the springs. She explained that back in the day, they didn’t have foam and the only way to make a comfortable chair was to use springs. Did I mention, if you keep the springs you will have to buy special string to re-tie the springs, special burlap strips to cover the springs, and fabric to cover the burlap. Trust me on this one, ditch the springs. Here is my chair in her original form. She doesn’t even look so bad in this picture, but the whicker is super worn and the cushion is what really grosses me out. It’s stained and crusty and who knows how old.

The chair lived in the corner with a blanket over the cushion for 6 months:

Here’s a close up of the cushion, eek.

Tools needed to reupholster a chair
These are not fancy tools, in fact I had all of them already on hand. I won the chalk paint at Haven (read more here). The Dremel is not necessary, but helpful for cutting and sanding the plywood. The one tool not shown in the picture that we used is a hand saw.
- Staple gun
- Screwdriver
- Hammer
- Sandpaper
- Paint brush
- Mini saw
- 2in foam pad
- 1.5 yard of upholstery fabric
- 1/2 in ply wood board
- 1 yard of batting

How to reupholster a chair
Step 1- Rip off the bottom
First, rip off the bottom of the chair! Here’s my first rip… The black stuff comes off super easily. It’s fun!

Step 2- Rip off the burlap
Under the black stuff was a lovely burlap criss cross which also rips off super easily…

Like I said, my chair is old and really smelly. I didn’t use gloves, but that would not be a bad investment! Keep a trash bag and vacuum handy… there are a lot of loose pieces. Oh yea, I would totally suggest doing it outside. Sadly, I don’t have that option living on the 17th floor of a building.

Step 3- Rip out staples
Although I didn’t use gloves, I did DIY a face mask in the midst of the mess. Check it out.
As I ripped, I pulled out as many staples/ nails I could. There are tons. Literally, 100’s in my chair.

I loved picking these out. So. much. fun. NOT.

Step 4- Pry the cushion apart
After I got the bottom of the chair gutted, I started on the underside of the cushion. I used the flat head screw driver to pry the welting out of the crack of my chair. You have to do this to all 4 sides of the chair. (See the video above for my trick to neatly get the upholstery out of the crack.)

Step 5- Don’t try to keep the springs
When I first started the reupholster project, I thought I was going to keep the springs. That’s why I started painting the chair at this stage. Pro Tip: Don’t do that. Gut the entire thing before painting, and don’t try to keep the springs.

Step 6- Paint
This is when I should have starting painting the chair… live and learn, right? The arrows indicate where I had to re-paint once deciding to ditch the springs. I also used the wood putty to fill the holes on the rim of the chair. One of my very favorite things about chalk paint is that the paint does not smell. Since painting outside is not an option, chalk paint it a life saver. Not to mention, there is no sanding involved and it covers well.

Step 7- Make the new cushion
Moving on to the upholstery part of this project. I bought a 2in. firm foam cushion at JoAnn’s with a 40% off coupon.

I used the mini saw![]() to cut the foam. I had the saw left over from cutting balsa wood for this project in the kitchen. I used newspaper to make a fancy stencil for my cushion.
to cut the foam. I had the saw left over from cutting balsa wood for this project in the kitchen. I used newspaper to make a fancy stencil for my cushion.

Believe it or not, the mini XACTO saw worked great for cutting the foam! TIP: use the mini saw like a knife cutting bread.

Just checking to make sure she fits in the chair! I had to give her a trim or 2…

Once the foam was cut, I Andy jumped for joy reluctantly cut the ply wood for me. We bought a 1/2 2′ X 4′ handy panel from Home Depot and I used my newspaper stencil to show Andy where to cut. Remember, we live in the 17th floor of a building, we don’t have a backyard or fancy tools. Andy cut the peice of wood with a Dremmel and a hand saw.

No saw horses for us, we use the outdoor furniture!

Once we got the shape right, I put the sanding tool on the Dremel and used that to make the board fit perfectly in the chair.

Once the board is cut, you’re almost done! It’s time to actually upholster. You’re going to lay everything out nice and pretty, like the picture below. It’s an upholstery sandwich. Lay fabric, batting, foam, and then board on a flat surface. use the staple gun to staple the batting to the board. Then use the staple gun to attach the fabric to the board. Pull the fabric as you go, and don’t just do one side at a time.

Here is the bottom of my almost finished upholstery job. The only thing left to do is cut the excess fabric off. 
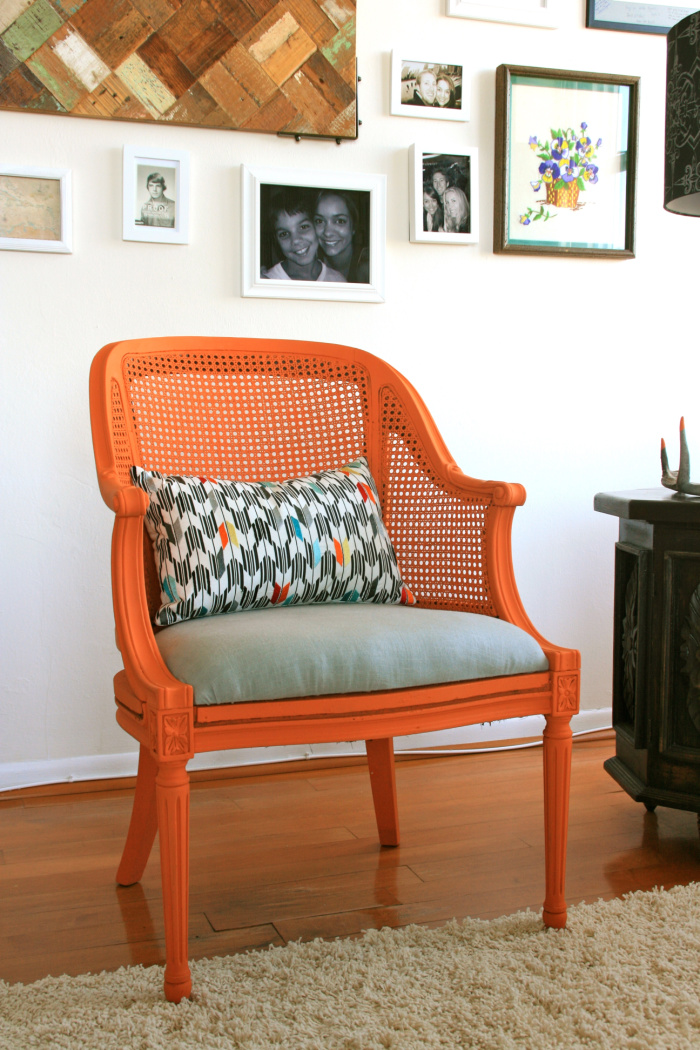
Once the seat cushion is done, plop that bad boy into place and enjoy your new and improved chair!


Cost breakdown for reupholstering a chair:
- Chair- free
- Paint- free
- Staple gun- already owned
- 2in foam pad- $13.99 (bought with 40% off coupon)
- 1.5 yard of upholstery fabric- $12.99 (50% sale)
- 1/2 in board- $15.97
- 1 yard of batting- $10.00 (40% off coupon)

Comments & Reviews
I had no idea that you needed a handsaw to re-upholster chairs. We have a couple of old dining chairs that we want to fix and want to make sure we get the best results. Personally, I do not have all the tools needed for the job so I’ll have to call a professional to help me out.
Thanks for sharing your tutorial at the party. Pinned, shared…
What a great tutorial on reupholstering! Something i’ve always thought about but never tried. InspiredThanks for linking up at #PureBlogLove Link Party!Hope to see you next Thursday at 8 p.m. EST. at http://www.homemadefoodjunkie.com. Can’t wait to see what you’ll bring.
wow who knew there were so many layers of stuff in there! awesome redo, love the finished chair! You all did a great job and we appreciate the step by step! Get some gloves for the next one! Thanks for linking with Snickerdoodle Sunday!
Oh, wow! You did a whole nine yards. I have changed the fabric before on chairs but this is so involved. Great tutorial and the chair looks awesome! Thanks for linking up at Thursday Favorite Things. Can’t wait to see what you’ll share next week!
It’s beautiful! Totally worth all the pain of the reupholter I woul think! Really well done 🙂
I would love for you to stop by my blog and join our Something to Talk About link party each Monday-Thursday!
Have a great day!
Karen
This is a GREAT tutorial! You made it look so easy Im confident I can do this! Thank!
Chair look’s great .. I would like to see what paint did you use? Great Renovation chairs
I used Annie Sloan chalk paint!
Thanks for the comprehensive tutorial. I found a beautiful chair at a thrift shop and need to pull all of the springs out of it. This helps!
First time to your blog, love it!
Great job, love the color!
Pick up an electric knife for cutting meat at a yard sale….works great for cutting through all foams.
Thanks for the tip! I’m so going to do that!
Not to be grumpy, but I cannot for the life of me understand why you chose to replace the strings? And why, when you had removed the strings, did you not make sure the fabric and the new cushion covered nicely and without creases? It should have been stretched better, if you had started in the middle of the cushion and had worked your way out to the corners, alternating back and front, you would have gotten a much neater end result. Really nice with the bold colours, though!
I love that orange!
Where did you get your sofa, I’m totally in love with it?!
The sofa is from cb2… the still have it 🙂
This is awesome! I really like the the colors and modern look of the chair. Thanks for the tutorial! 🙂
Amazing Jamie!!! Love the color choice! Congrats too!!!
Wow thanks for all of the helpful info. The final product is so cute, and it sure was a lot of work. My dad and I are actually in the middle of a similar project. It has been much harder than I would have thought. This post came at the right time for me 🙂
Hi Jamie!
Wow! Way to go! It looks awesome. I’m like you I would have had is sitting there longer than 6 months. Great project – thanks for sharing!
Thanks, JoAnna! I was so scared to do it! So happy I finally just did it!
Hi Jaime! This is a great tutorial! Very well put together/informational. Plus, I’m LOVING the orange! Fantastically bold!
Thanks! We love the orange too (but, it kind of blends in with the floors!)
I have 2 chairs sitting in my garage waiting for this. I’m a little scared cause I’ll have to reupholster the whole thing and well… that’s a lot of fabric to mess up with, lol! Thanks for the tutorial : )