What you need to make flower pot Chrsitmas toy soldiers
- 5 terra cotta flower pots (all the same size)
- Epoxy glue
- Paint (Red, blue, black, skin color)
- Ribbon
- Belt
- Hot glue
- Black faux fur (or black felt)
- Wooden base (we used the top of a stool)
- Pencil
How to make Christmas toy soldiers out of clay pots
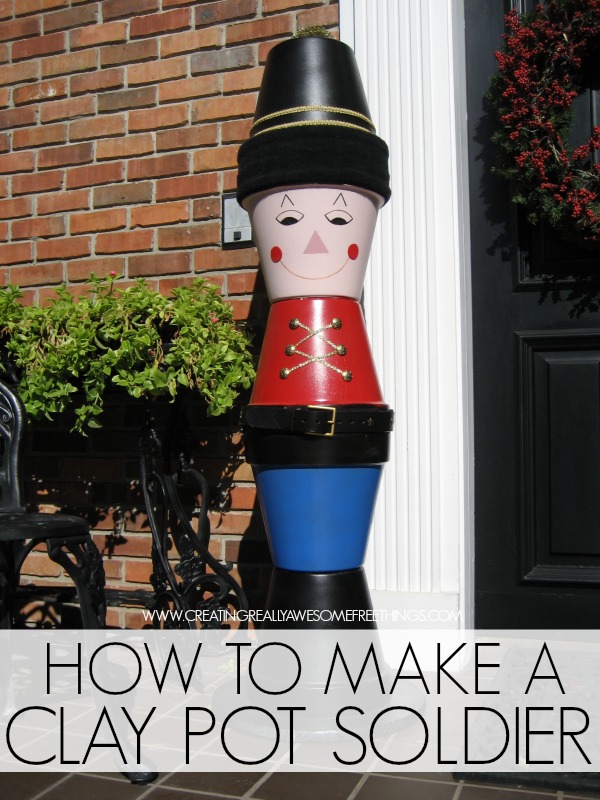
Ready to up your holiday porch decor? These flower pot Nutcracker soldiers are adorable and easy to make. Grab 5 clay pots and some paint and let’s get to work! You can make the nutcrackers out of any size pots, but all 5 pots need to be the same size.
Step 1- Make the base and paint black
We used the top of an old bar stool for the base of the pot soldier and painted it black. Then, paint one pot black.
Step 2- Paint black and blue
Next, it’s time to paint the second terra cotta pot. For this pot, paint the rim of the pot black and then paint the below the rim blu
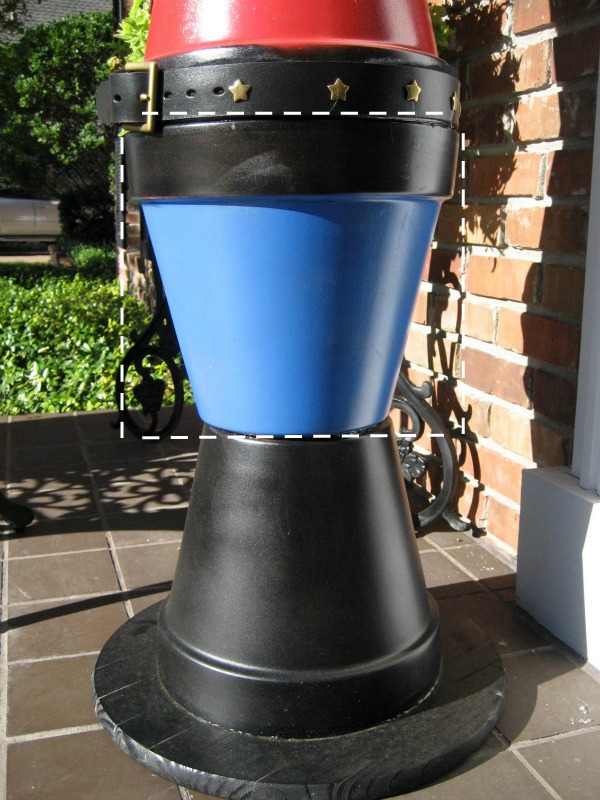
Step 3- Paint the 3rd pot
Keep the black paint out because you will paint the rim of the 3rd pot black to create the toy soldiers waist. Below the rim, paint red.
Step 4- Paint the 4th pot
There is no not need to paint the rim of the 4th pot since it will get covered with black felt. Below the rim of the pot, paint it skin tone as this pot will be soldiers face.

Step 5- Paint the 5th pot
The rim of the 5th pot does not need to be painted since it will also get covered with black felt. Paint the rest of this pot black. It will act as the soldiers hat.
Step 6- Add details
After ample drying time, it is time to bring the toy soldiers to life! Here are the embellishments my mom and I added:
- We added a real belt around the waist.
- 6 gold buttons and we used ribbon to connect
- We used fake fur around the the rim of the face pot and hat pot to add character to the hat. We put 2 stripes of gold ribbon above the fur to fancy up his hat.
- The hat topper is actually 2 gold Christmas ornaments we found at Hobby Lobby for 1$. We used hot glue to stick them together and then attached them to the pot with epoxy glue.
- For the face- Use a pencil to first draw on the mouth, eyes and eyebrows. We traced over the pencil with a Sharpie marker and then painted a simple light pink triangle for the nose. The rosy cheeks and inside of the eyes are felt.

Step 7- Glue pots together
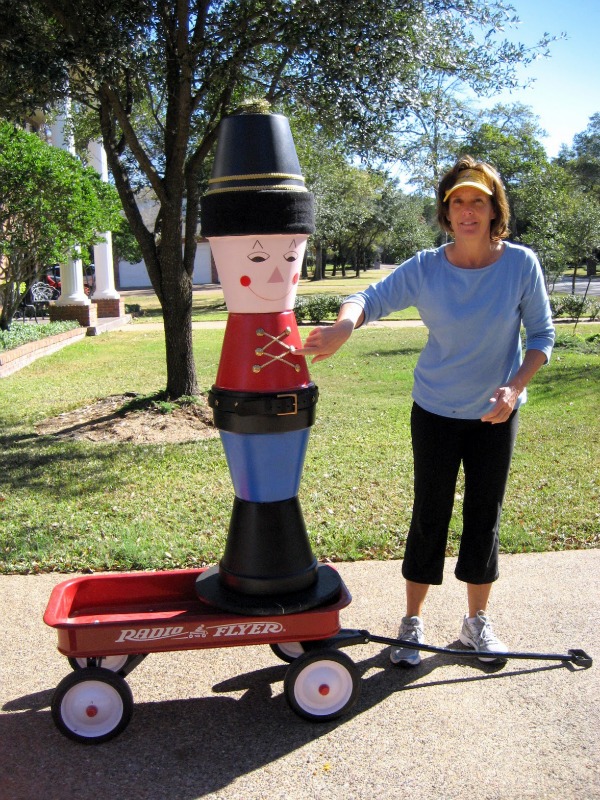
We glued the pots together with epoxy glue. Word to the wise, the toy soldiers are very heavy and moving them is difficult. We use a little red wagon to move the soldiers from place to place!

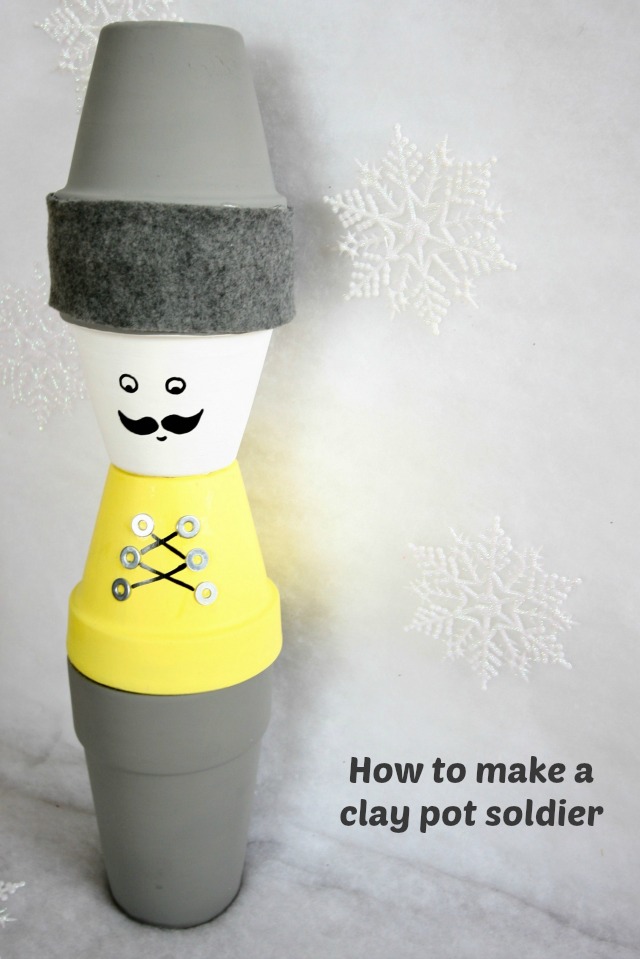
A few years after my mom and I made the big toy soldiers, I made these mini clay pot Christmas soldiers by myself. For the record, it was so much easier. Also, you only need 4 pots for these tiny terra cotta Nutcrackers.
Have you ever made Christmas toy soldiers our of clay pots? I’d love to hear…
Looking for Christmas craft ideas, don’t miss:

Comments & Reviews
I made these with my girl scout about 25yrs ago we use Dixie cups instead of clay pots. they turn out great I still have a set..
Great idea for a kids craft!
I saw a tip on facebook that makes total sense. Put a 3/4″ dowel down the center, attaching it to the base with a screw and a round screw knob at the top. It will help keep it together for years because this guy will weigh quite a bit. Courtesy of Debi Reiser Dame… https://www.facebook.com/photo.php?fbid=10200214335480464&set=p.10200214335480464&type=1&theater
What kind of paint did you use? Thanks!
I’ve made these for my front porch also. Instead of gluing them together, I got a dowel rod that will fit through the holes in the bottom of the pots. I screwed it into the bottom round board. I then just slipped the pots in order over the dowels. This eliminates trying to move the whole thing at one time. Hope this helps you out!
<
Great idea, Twyla! I’ve been trying to think of an alternative to gluing the huge pots so that they’re easier to move. The dowel rod makes it do-able!
This is adorable. My mom goes all out every year to decorate. She is always looking for something new. I’m thinking I will try with the plastic pots because of the weight and use velcro to hook them together so they can be taken apart and stored.
Plastic pots, velcro attachment…I never considered that, but it’s brilliant! Makes these so much easier to store and transport. Love the idea!
Love this. I make the little ones every year to give as gifts to different people. Yours is definitely bigger than mine. They look great!
This is so cute. Thank you for sharing how you made it.
That is SO cool! I want to make one. Thanks for the tutorial. 🙂
I have been looking how to make these! Could you forward a pic of the top? Did you use one gold ball per soldier hat?
Thanks so much!!
Elizabeth
I love this!!
Any tips on what type of paint to use? Also did you seal with something after painting? Thanks!
Fabulous ,,,Can’t wait to make it ..Thanks for sharing am making big and small ones
Nice work,inspiring…
That's awesome! Thanks for sharing.
Another awesome creation, I bet those were heavy, and yeah little ones would be cute too, but these are just so BOLD, and DEMAND attention, so cute, guarding the house like that.
Girl, please come share, **Amaze me August** or even my Christmas party **6 weeks 2 JINGLE**, I would just really love to have you.
Bella 🙂
for a second there I thought your mom lived in my neighborhood because I've been eye some soldiers just like that! Super cute!
My MIL was just telling me that she wanted to find some toy soldiers for her front porch but couldn't find anything affordable.
I wish I could think of a way to make them easier to store… but can't come up with anything!
Try adding 4 roller cart wheels with locking brakes to the “stool seat” or treated plywood base. That should make it easier to decorate, allow easier transporting and raise it up off the ground a bit so that you can decorate without blocking its bottom pot. I’ve also seen these with a small pot cut in half painted black attached to the bottom pot at the base with the rim end to the large pot. Decorate with smaller gold buttons and cording for shoes.
Lovely, and easy to make ♥ I am a new follower lol. Going to check the rest of your blog now.
Hugs from the Netherlands
That is AMAZINGLY cute! And I love the way the look in front of the door! I am going to have to find a way to make them more secure because I am sure my kids would knock that guy over!
Wow! These look great. You do have to have an impressive sized house to display them. They look great on your porch.
My friend and I want to make these! I need two for my mantel base. These would be perfect! I am a new follower. Follow me!!
http://lollipopbouquetmadness.blogspot.com
Wow this is super cool
These look amazing outside your house. Too adorable. I think I'll be making a mini-set of my very own. Thanks for the great inspiration!
http://boyohboyohboycrafts.blogspot.com
How adorable! i love it!
I stumbled over from Be Different..Act Normal. This is fantastic. I love, love, love Nutcrackers. I don't think I'll be able to pull this off this year but I'm definitely putting this on the "to do" list for next year. Thanks for sharing!
http://www.lifeontheridgeside.blogspot.com
Oh my goodness this is so super cute! I am totally going to make one of these for our front porch. Thanks for sharing!!
Super cute. My mom has one of these from back when I was younger and I haven't seen them made it a while. He looks so great.
This is unbelievably cute! Thanks for sharing!
My mom had one of these when I was growing up. I am thinking I am going to have to make one this year to add to my Christmas deco!
Hi! I am your newest fri follow! Nice to 'meet' you!
very cute!
I'd love if you followed me back
http://www.withourbest.com
-karissa